Halloween Party Food - Frankenstein Layered Dip

Halloween Party Food Recipe: Frankenstein Layered Taco Dip with Spooky Tortilla Crisps

Cooking, Holidays

Get Spooky & Satisfy with Frankenstein Layered Dip & Halloween Tortilla Crisps 🎃

As the leaves outside turn golden, the air crisp, and the pumpkin-candles flicker, it’s time to bring a little themed magic into your get-togethers. Enter the show-stopper: the Frankenstein Layered Dip with Halloween Tortilla Crisps (thanks to Ralphs for the inspiration!) — a booo-tiful, effortless, crowd-pleasing recipe perfect for families, Halloween gatherings, and friendly potlucks. For the complete step-by-step recipe, please scroll to the bottom of this post.


Why it’s a winner for families and get-togethers

  • Easy to throw together: The recipe lists a prep time of just about 35 minutes and a cook/assembly time of around 8 minutes (total approx. 43 minutes). Perfect for squeezing in after the kids’ homework or while you’re prepping other dishes.
  • Layered fun for little helpers: Kids can help build the “Franken-look” layers — spreading the sour cream/cream-cheese base, layering pico de gallo, shredded cheese, guacamole, beans … it becomes a hands-on mini-project.
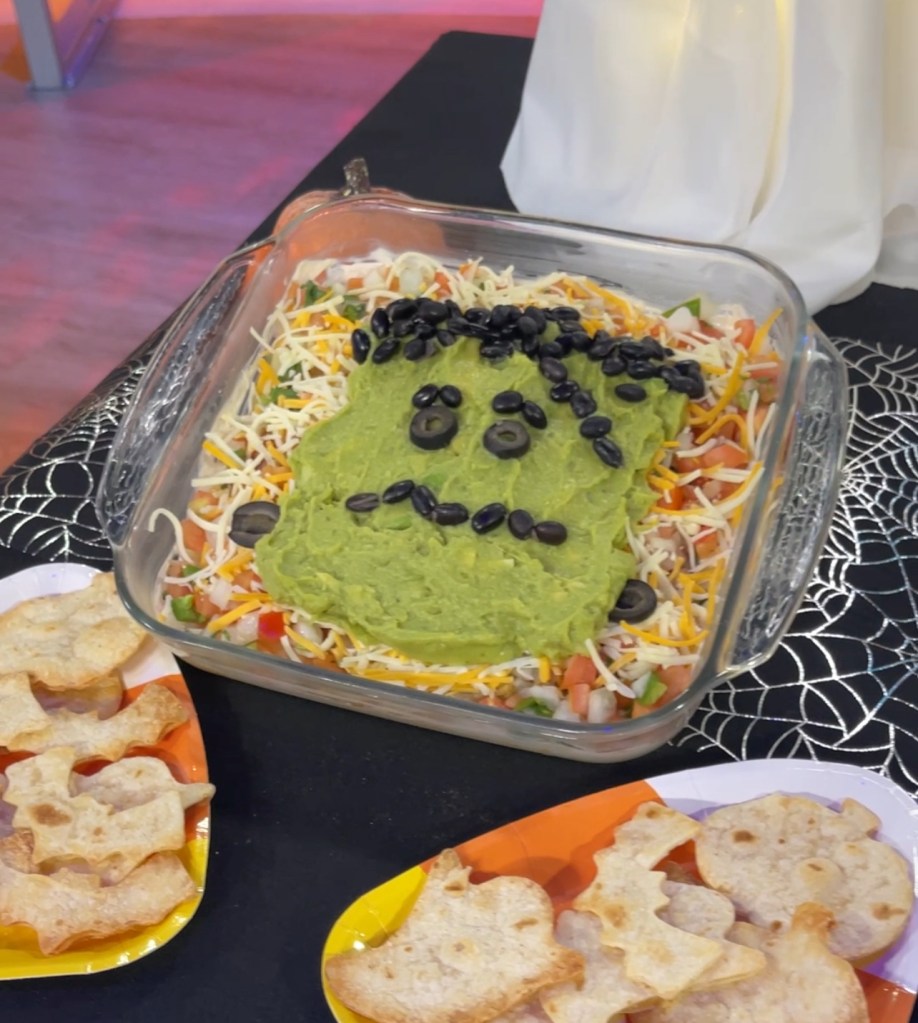
  • Festive and thematic without being fussy: With a clever Frankenstein-inspired presentation (think green guacamole “skin”, black olive “bolts”, bean “scars” or whatever you choose), it brings Halloween décor to the table without requiring a twenty-step gourmet process.
  • Feeds a crowd: The recipe serves about 24 (so you’ve got more than enough for neighbours, trick-or-treaters, and family members alike) according to the original listing (Ralphs)
  • Kid-friendly & adjustable: You can dial the spice up or down, skip or swap ingredients, and still maintain the layered visual and flavor impact.
  • Great for mingling: One dish everyone can graze on while chatting, costumed kids dart about, and adults sip something seasonal. No one stuck in the kitchen.
Frankenstein Inspired Taco Dip for Halloween Parties

How to turn it into a Halloween hit

  • Presentation is everything: Use a rectangular or oval dish and layer in the “Frankenstein colours”. Spread the sour cream/cream cheese mix as a base (that’s the “face”). On top, layer green guacamole (the “skin”) and then arrange black olives to look like hair or bolts. Maybe a drizzle of taco-seasoning-spiced sour cream to look like “scars”.
  • Use themed chips: Create Halloween tortilla chips by using cookie cutters to make pumpkins, bats and ghosts out of tortillas (recipe below). If you don’t have time to make those, serve the dip with green spinach tortilla chips, or black corn chips, or even pumpkin-shaped tortilla chips if you find them. Adds extra fun for the kids.
  • Add spooky bite markers: Place little plastic picks shaped like skulls or use toothpicks with mini flags labeled “Bite the monster!” to make it interactive.
  • Pair it with a family-friendly drink: Maybe a “Witch’s Brew” punch or just sparkling apple cider in orange cups—this dish hits the savoury snack spot, so you can keep beverages simple.
  • Let the kids get creative: After you’ve done the main layers, let each child add one extra decoration on top—a cherry-tomato “eye”, a slice of jalapeño “mouth”, etc. Great for bonding and gives them a sense of ownership.
  • Prep ahead: Because the layered dip is simple, you can assemble most of it earlier in the day (or even the night before) and just finish any fresh toppings just before guests arrive. That means more time to greet people, help with costumes, and enjoy the moment.

Final spooky bite

So, whether you’re hosting a mini Halloween party, prepping for costume night, or simply want a snack that says festive + family + easy, the Frankenstein Layered Dip is your go-to. It brings flavor, visual fun, and zero fuss.

Photo credit: Ralphs.com

RECIPE: Frankenstein Layered Taco Dip with Spooky Tortilla Crisps

Serves: 24 | Prep Time: Minutes | Cook Time: 8 minutes

Ingredients

  • 8 ounces Sour Cream
  • 8 ounces cream cheese, softened
  • 1 tablespoon taco seasoning mix
  • 2 cups pico de gallo
  • 2 cups shredded Mexican cheese blend
  • 2 cups prepared guacamole
  • 2 large black olives
  • 2⁄3 cup black beans, drained and rinsed
  • 8 (10”) flour tortillas
  • 4 tablespoons butter
  • Garlic salt, to taste

Directions

  1. Combine sour cream, cream cheese and taco seasoning in a bowl until well blended.
  2. In an 8”x 8” casserole dish evenly spread sour cream mixture, top with a layer each of pico, cheese and guacamole. Arrange black olive and black beans to create Frankenstein’s hair, eyes, brows and mouth. Refrigerate until serving.
  3. Heat oven to 400°F.
  4. Cut tortillas with a 2½”-3” Halloween themed cookie cutter. Place on baking sheets; brush with melted butter on one side. Flip brush with remaining butter. Sprinkle with garlic salt. Bake 6-8 minutes until browned and crispy; cool.
  5. Serve tortilla crisps with layered dip.
  6. Refrigerate leftover dip. Store crisps at room temperature in an airtight container.

This recipe was featured in my KTLA Morning News segment about easy Halloween party food. You can watch the segment below and find more recipes on my blog here.

Watch Halloween Party Food Ideas on KTLA Morning News in Los Angeles below!

Do you have any favorite Halloween party food recipes? Let me know in the comments below! Don’t forget to connect with me on Instagram and TikTok!

XO Maggie

Easy Family-Friendly Breakfast Recipes

Cooking, Health & Wellness, kids

AFFILIATE DISCLOSURE: Some of this post contains affiliate links for the products I use and LOVE. If you take action on these links (like clicking, buying, etc.), I may receive compensation at no cost to you. As always, all opinions are my own, and I’ll only recommend what I truly like and recommend. For more information about affiliates and your privacy, view our Terms & Conditions page here.

It’s back-to-school season, so mornings are early and rushed! Unfortunately, this often leaves little time to feed our families a nutritious breakfast. But, as the saying goes, “breakfast is the most important meal of the day,” and its imperative that our kiddos get a healthy start before their long day at school and activities.

I know that with the early mornings’ limited time, plus a house full of picky eaters and different taste preferences, it feels much easier to resort to packaged donuts and pastries or swing through the fast food drive-through for a chicken biscuit for a quick breakfast. However, I’m here to assure you that making a fast, healthful breakfast for your family does not have to be hard, time consuming or expensive. As long as you’re willing to put in just a little prep work, you and your family can eat a variety of delicious and nutritious every day of the week! Plus, you’ll save money from avoiding coffee shops and fast food restaurants!

Check out my top family-friendly breakfast recipe ideas below!

Apple “Donuts”

Recipe: Food Network

Not only do Apple “Donuts” encourage your children to eat more fruit — it’s also a great recipe for little hands to get involved in making! Slice apples into 1/2-inch circles, and use a small circular cookie cutter or small melon baller to cut a hole in the center of each to make a “donut.” Top apples with better-for-you “frosting,” like peanut butter, cream cheese and greek yogurt. Add more fun with additional toppings, like sprinkles, sliced strawberries, granola and chocolate chips.

One-Bowl, Multi-Flavor Mini Muffins

Recipe: The Baker Mama

This one-bowl muffin batter recipe is easy to make. After adding the batter to muffin tins, simply drop in your favorite mix-ins, like blueberries, chocolate chips, cinnamon sugar, bananas or sprinkles, to create multiple flavors in one batch. This recipe is perfect for all the different taste preferences in your house or if your kiddos get bored of eating the same flavor every morning. 

Super Pancakes

Don’t settle for boring regular pancakes when you can have “Super Pancakes” filled with superpower ingredients! This recipe is especially beneficial for kids who need help eating more protein, fruits and vegetables. I make these pancakes with Kodiak Protein-Packed Flapjack and Waffle Mix and mix in milk and egg instead of water for added protein! After the batter is made, I mix in mashed banana and grated zucchini (you can’t even taste the zucchini, I promise!). Make a large batch of these Super Pancakes on Sunday morning to quickly heat up for breakfast for 3-4 days!

Photo credit: Confessions of a Midnight Baker

Coffee Shop Dupe Egg Bites

Recipe: Once Upon a Chef

Save time and money by skipping the coffee shop for your favorite egg bites and making them at home! The secret ingredient in these egg, bacon and cheese egg bites is cottage cheese and tabasco sauce! They’re so flavorful and easy to make ahead of time. Store in the fridge for 3 days or freezer for 2 months. You won’t miss your pricey store-bought egg bites!

Quick Caprese Breakfast Sandwich

Recipe: Jones Dairy Farm

This sandwich is low on prep time but full on flavor! Most breakfast sandwiches are time consuming to make, but not this Caprese Breakfast Sandwich with the help of Jones Dairy Farm Canadian Bacon, Egg Life Egg White Wraps and pre-sliced BelGioioso Fresh Mozzarella. Cut the egg wrap down into 4-6 pieces. Lightly toast the English muffin. Top one half with basil leaves, 2-3 slices of mozzarella, 2-3 slices of tomato. Finish with 2-3 egg slices and 2 slices of Canadian bacon.  

Protein Yogurt Parfait

Recipe: Created by ME! My full recipe is available in a previous blog post here

When you’re challenged with food allergies and diet restrictions but still want a high-protein breakfast, this make-ahead dairy, egg and gluten free yogurt parfait is a delectable choice! It’s made with my favorite Super Granola and Vanilla Cinnamon Protein Powder from Kroma Wellness, along with creamy Coconut Yogurt and Berries. You could add more toppings, too, like honey, chia seeds, hemp seeds, nut butter, etc. Customize it to your preference! This is a great recipe to make ahead in a mason jar to bring on-the-go during busy mornings!

Which of these recipes do you want to try? Let me know in the comments below! For more family-friendly products, activities and recipe ideas, be sure to follow me on Instagram and TikTok!

XO Maggie

Best Protein Yogurt Parfait – Gluten, Egg and Dairy Free!

Cooking, Health & Wellness

AFFILIATE DISCLOSURE: Some of this post contains affiliate links for the products I use and LOVE. If you take action on these links (like clicking, buying, etc.), I may receive compensation at no cost to you. As always, all opinions are my own, and I’ll only recommend what I truly like and recommend. For more information about affiliates and your privacy, view our Terms & Conditions page here.

Scroll to the end of this post for my gluten, egg and dairy free yogurt parfait recipe!

The creamiest dreamiest yogurt parfait for a nutritious breakfast!

First, some background on why I made this recipe…

So, this is a bit awkward and embarrassing for me to admit, but because I know my readership is made up of incredibly supportive ladies, I’m going to follow Natasha Bedingfield‘s advice and “release my inhibitions”…

By the way, I saw Natasha perform at a fundraising gala this past year, and she was phenomenal! “Unwritten” was the best I’ve ever heard it since it was released 20 years ago! Okay, I’ve digressed and aged myself, so let’s get back on track…

Back to what I was saying… Here it goes… I’m embarrassed to admit that I HAVE HORMONAL ACNE.

UGH! I hate seeing that in writing because it makes my hormonal acne so real. It’s not that I don’t believe that I have acne – clearly, I do, as my face doesn’t lie to me in the mirror! It’s just that I’ve had to come to the brutal realization that this is not a random breakout from sleeping with makeup on or “just a phase.” I’ve been dealing with hormonal acne on-and-off ever since having children 6 years ago. It will sometimes clear up for a couple months, so I’ll think I’ve moved past it. Then, low and behold… painful, ugly, annoying cystic acne reappears on my jawline again. I hate this acne, because it feels so odd to have as an adult. I was extremely lucky and did not have acne problems during puberty or my teenage years. The acne didn’t start until pregnancy.

In the past, I’ve managed my hormonal acne with topical prescription products. For this round of acne that started about 9 months ago, I waited a few months before getting back into my dermatologist’s office to start prescriptions again. I was hoping it would clear up on its own. However, I’ve now been on my topical prescriptions (Clindamycin, Winlevi and Tretinoin) for 3+ months and nothing is getting better. In fact, my skin is just getting really, really dry and flaking, which is probably not helpful either.

I’ve decided its time to try a different approach: a holistic treatment encompassing diet and mental health. I’ve gone down a very big internet and podcast rabbit hole exploring hormonal acne treatments, and a common theme I’ve seen is eliminating dairy and eggs (and sometimes gluten) in diet on top of stress management. So, here I go… ready to conquer this approach! Although, it won’t be easy…

You see, I’m a protein girly, so eliminating eggs and dairy throws a major wrench into my usual breakfast eats. I typically love to eat greek yogurt topped with nuts and berries or make a veggie and cheese-filled omelette. The idea of eating oatmeal, toast, pancakes or waffles does not sound satisfying to me, nor do those meals usually have a good amount of protein in them for starting my day and meeting my daily protein requirements. As I discovered in my research for hormonal acne solutions, protein is a key conductor in balancing our hormones, and I try to eat at least 20 to 30 grams of protein per meal.

Loving my protein parfait made with Kroma protein and granola

Then, I remembered Kroma Wellness, a brand dedicated to simplifying eating nutritious, anti-inflammatory, clean food that makes you feel your very best. I’m so grateful that I found Kroma 2 years ago when I did their 5-Day Reset (you can read about my life-changing experience with the Kroma Reset here). I took a look at two of my favorite Kroma products that I always keep in stock – Super Granola and Vanilla Cinnamon Protein Powder – and got the idea for a dairy-free, protein yogurt parfait!

I have avoided dairy-free yogurt in the past, because it’s usually filled with alien junk ingredients and sugar with minimal protein. But, blending the Vanilla Cinnamon Protein Powder with a quality pure coconut yogurt (like Cocojune Pure Coconut) amps up the protein content while still getting rich taste, healthy fats and tons of probiotics.

Kroma’s Vanilla Cinnamon Protein Powder adds a decadent dessert-like flavor to dairy-free yogurt, milk, smoothies and baked goods. The powder boasts 20g of protein per serving, has 9/9 Essential Amino Acids, and is loaded with superfoods and adaptogens.

Now let’s talk about what we’re topping our yogurt parfaits with: Super Granola! This is the best granola ever made with a wholesome medley of 10 superfoods that’s light yet satisfyingly crunchy and an irresistible vanilla cinnamon flavor. There is no gluten or refined sugar, which is so rare compared to most granola on grocery store shelves! It’s made with high-quality ingredients and functional superfoods, like crunchy clusters of gluten-free rolled oats, cashews, pumpkin seeds, hemp seeds, sesame seeds, dried blueberries, and mulberries. And, it’s boosted with adaptogenic maca to enhance mood and energy. This granola is the perfect topping to a yogurt parfait, but it’s also great to eat alone as a snack!

Watch me make this Protein Yogurt Parfait on Instagram here:

This DEG Free (Dairy, Egg and Gluten Free) Protein Parfait has now become a go-to breakfast of mine. It makes two small parfaits, so I’ll often make them in mason jars, so I can save the second one for tomorrow. I look forward to this creamy dreamy parfait every morning! Below is the recipe, and I can’t wait to hear what you think after you try it!

Protein Yogurt Parfait Recipe:

Dairy, Egg and Gluten Free!

Yield: 2 yogurt parfaits | Servings: 2 | Prep Time: 5 minutes | Total Time: 5 minutes

Ingredients:

Directions:

  1. Add coconut yogurt, protein powder and almond milk to a bowl and mix. Add more almond milk, if needed, to reach your desired consistency.
  2. Divide the protein yogurt mixture into two serving bowls. Top with berries, nut butter, granola and a drizzle of honey. Enjoy!
Dairy, Egg and Gluten Free Yogurt Protein Parfait

I hope you love this breakfast recipe as much as I do! Let me know if you try it in the comments, and be sure to connect with me on Instagram and TikTok!

XO Maggie

Easy July 4th Trifle Recipe

Cooking, Holidays

If you’re looking for an impressive July 4th dessert that takes little effort, this festive red, white and blue trifle checks all the boxes! It’s yummy, easy, and fun! This dessert is sure to be the hit of your July 4th party!

Easy and festive July 4th trifle!

This “almost homemade” July 4th trifle is made with simple ingredients easily found at your local grocer: pre-made angel food cake, Cool Whip, strawberries and blueberries – that’s it!! If you don’t have a trifle dish, you could use a large clear glass bowl. This recipe is perfect for a 2.5 to 3-quart trifle dish. I used a large 5.5-quart trifle bowl, so I doubled this recipe.

The red, white and blue from the strawberries, blueberries and Cool Whip makes it perfect for the Fourth of July! Once you’re finished assembling the trifle, create a pretty flag design with the berries as a topper for an Instagram-worthy party table centerpiece!

Easy July 4th Trifle Recipe

Easy July 4th Trifle

Ingredients:

  • 1 13-16 oz. angel food cake, cut into 1-inch cubes (easiest if pre-made from your grocer’s bakery or you can also do a simple cake mix)
  • 1 quart sliced strawberries
  • 1 pint blueberries
  • 2 8 oz. containers Cool Whip
    • *reserve a few strawberries and blueberries for topping

Directions:

  1. In a 2.5 to 3-quart trifle dish or large glass bowl, layer half of the angel food cake, strawberries, blueberries and then one container whipped topping. Repeat layers with remaining angel food cake, strawberries, blueberries and second container whipped topping.
  2. Create an American flag design with your remaining blueberries and strawberries to top your trifle.
  3. Serve immediately or store in the refrigerator until ready to serve. Best enjoyed within 24 hours.

Watch me make this Easy July 4th Trifle on Instagram:

July 4th Trifle on Instagram!

Let me know if you plan to try this for your July 4th party by commenting below or connecting with me on Instagram or TikTok!

Festive Red, White and Blue Dessert!

AFFILIATE DISCLOSURE: Some of this post contains affiliate links for the products I use and LOVE. If you take action on these links (like clicking, buying, etc.), I may receive compensation at no cost to you. As always, all opinions are my own, and I’ll only recommend what I truly love. For more information about affiliates and your privacy, view our Terms & Conditions page here.

Easy July 4th Dessert: Red, White and Blue Fruit Skewers!

Cooking, Holidays, Kitchen, Lifestyle
Festive in Red, White and Blue!

The Fourth of July is my favorite holiday! It’s the best of summer all rolled into one day — family, friends, BBQ, parties, yummy treats, fun drinks, great music, and fireworks!

We’re hosting our first big Fourth of July party at our house this year, and it’s a party I’ve been dreaming of hosting ever since we bought this home almost five years ago! We finally finished our backyard remodel last fall, and I can’t wait for everyone to enjoy our pool and great view of fireworks from our balcony this year!

If you’ve been following me for a while, you know that I love cooking and hosting parties. But, when it comes to hosting a really big party, like we are this year for July 4th, I’m all about making dishes that are simple, quick, and festive! That’s why I look for easy recipes that can feed a crowd but look fun to eat, too!

Enter: Red, White and Blue Fruit Skewers!

Easy Red, White and Blue Fruit Skewers

Because beautiful red strawberries and sweet blueberries are in season, it’s easy to add patriotic color to your July 4th party table. I love these Red, White and Blue Fruit because they’re fun to make AND eat! Your kids will love helping you assemble them! Just make sure they’re old enough to handle a wooden skewer without poking themselves! I love the mini marshmallows in this recipe because they instantly upgrade your treat from a simple fruit skewer to a dessert!

Ingredients for Red, White and Blue Fruit Skewers: Strawberries, Blueberries, Mini Marshmallows and Wooden Skewers

Here’s how to make Red, White and Blue Fruit Skewers!

Red, White and Blue Fruit Skewers Recipe:

Ingredients:

Directions:

  • Wash and dry strawberries and blueberries
  • Cut strawberries to match the size of blueberries and mini marshmallows
  • Thread berries and marshmallows onto skewer in red, white and blue pattern
  • Cover and store in fridge until ready to serve. Enjoy within 24 hours.
Red, White and Blue Fruit Skewers for the Fourth of July!

Other Ideas for July 4th Fruit Skewers:

  • Swap out mini marshmallows for bananas or angel food cake
  • Try other blackberries or raspberries instead of blueberries and strawberries
  • Use mini star shaped cookie cutters to make festive shapes out of the strawberries or angel food cake

Let me know if you try these skewers, and please share other fun July 4th dessert recipes with me! Be sure to follow me on Instagram and TikTok for more ideas!

AFFILIATE DISCLOSURE: Some of this post contains affiliate links for the products I use and LOVE. If you take action on these links (like clicking, buying, etc.), I may receive compensation at no cost to you. As always, all opinions are my own, and I’ll only recommend what I truly love. For more information about affiliates and your privacy, view our Terms & Conditions page here.

Easy, Healthy Veggie Dip

Cooking, Health & Wellness, Kitchen

Don’t look any further for an Easy, Healthy Veggie Dip recipe… This is the EASIEST recipe that only takes 5 minutes! Plus, it’s made with protein-rich Greek yogurt and herbs, so it’s good for you, too!

When hosting kid-friendly parties, my favorite food options are easy appetizers and finger foods. This grab-and-go food set-up makes it so much simpler for families to eat whenever they’re hungry and spend more time playing and socializing. Can you imagine trying to get several toddlers to sit down for a formal brunch? YIKES! They’re much more interested in playing with friends while taking bites here and there.

I believe every party has to have a veggie option. Living in Southern California, there is ALWAYS at least one person who loves eating veggies or looking for healthier food options at parties. For this reason, I love to make a yummy veggie plate paired with an irresistible dip to upgrade what can sometimes be a boring crudite platter. I like to add festive touches, like special bowls or holiday decor, and fill in empty space with parsley and kale leaves to create a beautifully appetizing veggie platter.

The perfect Veggie Platter for Easter with Easy, Healthy Veggie Dip!

If you know me, I’m all about EASY! I have two toddlers (ages 3 and 18 months), so when hosting a party, I’m not interested in spending hours in the kitchen prepping food. But, the “hostess with the mostest” in me also doesn’t like serving store-bought dips. I want the occasion feel special with food that’s homemade! Plus, sometimes you don’t know what you’re getting in those pre-made store-bought dips, which can sometimes include lots of sugar and preservatives – yuck! This Easy, Healthy Veggie Dip recipe is just as the name suggests – EASY! Most of the ingredients you probably already have at home. To prepare, all you have to do is combine all the ingredients and stir! No blenders, no chopping!

I also love this recipe because it’s light and healthy! So many veggie dip recipes include mayonnaise, sour cream, cream cheese and/or SUGAR (which I think totally defeats the point of eating veggies!), but this recipe features protein-rich Greek yogurt, a variety of herbs, and fresh lemon juice. I’ve always liked to eat healthy, but since becoming a mom, I pay extra attention to what’s in the food I’m serving to our kiddos. This is a recipe that everyone can feel good about eating!

For this Easter brunch party, I put the Easy, Healthy Veggie Dip in an adorable stoneware bunny platter with a dip bowl from Target. I put the bunny platter on a large wooden serving tray and added cut veggies, RW Garcia crackers, and a bowl of hummus for guests to have a couple dip options.

Easter themed veggie platter

Best Veggies for Dipping:

  • Cucumbers – slice into rounds or cut into matchsticks
  • Baby Carrots
  • Rainbow Carrots – peel and cut in half length wise
  • Celery
  • Cherry tomatoes
  • Sugar snap peas
  • Bell peppers – Sliced into matchsticks
  • Broccoli
  • Cauliflower

Other Snacks for Dipping:

Recipe: Easy, Healthy Veggie Dip

Yields: 4-8 | Prep Time: 5 minutes | Total Time: 5 minutes

Ingredients:

  • 1 cup Greek yogurt (non-fat or 2% fat)
  • 1/2 teaspoon garlic powder
  • 1/2 teaspoon onion powder
  • 1/4 teaspoon dried dill
  • 1/4 teaspoon salt
  • 1/2 teaspoon pepper
  • 1/2 teaspoon dried parsley
  • 1/2 teaspoon dried basil
  • 1-2 tablespoons fresh lemon juice to taste

Instructions:

  1. In a bowl, combine all ingredients.
  2. Mix well until combined.
  3. Serve with vegetables and/or crackers of choice. Top with finely chopped fresh parsley or dill.
Perfect Veggie Platter

Recipe Tips:

  • If you choose 2% fat Greek yogurt, your dip will be thicker. I like to add more lemon juice to thin it up a bit. You could also add a teaspoon of olive oil.
  • You can choose to use fresh herbs instead of dried, but be sure to double the amount of fresh herbs than what the recipe calls for with dried herbs.

I hope you love this Easy, Healthy Veggie Dip! I’m always looking for easy appetizer recipes, so feel free to share yours in the comments below! Connect with me on Instagram and TikTok for more family-friendly ideas!

AFFILIATE DISCLOSURE: Some of this post contains affiliate links for the products I use and LOVE. If you take action on these links (like clicking, buying, etc.), I may receive compensation at no cost to you. As always, all opinions are my own, and I’ll only recommend what I truly love. For more information about affiliates and your privacy, view our Terms & Conditions page here.

Best Banana Zucchini Bread Muffins Recipe!

Cooking, Health & Wellness, Home, Kitchen, Lifestyle

Hey Mamas! If you’re like me and have picky eaters in your house, it can be a struggle to get kids to eat green vegetables! My solution: Sneak veggies into their favorite foods!

Great for picky eaters: I have THE BEST banana bread recipe (originally adapted from Delish.com) that I’ve converted into muffins with hidden zucchini! My kids have never once said, “Ewe,” “What’s the green stuff?” or “I can taste vegetables!” when I serve them these muffins! SCORE!

Why this is the best Banana Zucchini Bread Muffin recipe: When I say this is the best banana bread recipe, I truly mean it! During the pandemic, I made one banana bread loaf for every month we were locked down in LA County. I tried six variations of banana bread, so I can attest that this is the very best recipe! Utilizing three bananas is the perfect amount of flavor and sweetness, and the full fat sour cream makes the bread so moist! You will never need to try another banana bread recipe again… This is IT! You’re welcome.

Original recipe swaps: I make a couple swaps for these Banana Zucchini Bread Muffins from the original Banana Bread Recipe from Delish.com to make them kid-friendly and mom-approved. First, I add half of a grated zucchini. Secondly, I add mini semi-sweet chocolate chips! My kids go nuts over chocolate anything, so this is a special treat. In my opinion, regular sized chocolate chips overpower the the banana flavor, so I prefer to use mini sized chips. I haven’t tried the muffin recipe without the mini semi-sweet chocolate chips yet, but I have made the original loaf recipe without them, and it was still soooo gooood!

Make it even healthier!: Recently, I completed a 5-day wellness reset that eliminated sugar, gluten and dairy from my diet, and I saw some phenomenal health benefits (like my average resting heart rate dropping by 9 heartbeats per minute – wow!). Since then, I’ve been testing swapping out sugar and gluten in some of my favorite recipes, like this one! If you want to go gluten- or sugar-free, try Bob Mills Gluten Free All Purpose Baking Flour and Truvia Sweet Complete Monk Fruit Sweetener. I could not tell the difference when we made these swaps! So good!

Mix-ins and frosting ideas: If you want to add some more oomph to this recipe, add 1/2 cup chopped nuts (pecans and walnuts are my favorite) or coconut! Or, add a cream cheese frosting for a real decadent treat that’s totally approved by the health food gods because we’re already eating zucchini – LOL! My favorite is a vegan cream cheese frosting recipe from Peanut Butter & Jilly found here.

I prefer using mini chocolate chips in this banana zucchini bread recipe!

Tips for the best Banana Zucchini Bread Muffins:

  • You can’t have bananas that are too ripe for this recipe. The more ripe, the better!
  • Shred the zucchini with a VERY fine grater. You don’t want chunky zucchini in your muffins!
  • Be sure to drain and soak the moisture from the grated zucchini with a paper or cloth towel. Do not skip this step of the recipe or else you’ll have watery batter!
  • This recipe makes about 18 muffins, so I always give a few to our neighbors and teachers. Everyone will love these muffins!

Can you convert muffins into bread loaves? Yes! To be honest, my most favorite way to make this recipe is a large 9×5 loaf pan instead of muffins. However, my kids love the muffins and they’re much easier to transport and serve to kids in muffin form.

How to Make One Banana Zucchini Bread Loaf:

  • Preheat oven to 350º. Line a 9×5-inch loaf pan with parchment and grease with cooking spray.
  • Follow recipe as written below, but bake for 1 hour instead of 25 minutes. Let bread cool for at least 10 minutes before serving.

How To Make Multiple Mini Banana Zucchini Bread Loaves:

  • Preheat oven to 350º. Line four  3.8×2.5-inch loaf pans with parchment and grease with cooking spray.
  • Follow recipe as written below, but bake for 30-35 minutes. Keep an eye on it, as all ovens cook at different speeds. Let bread cool for at least 10 minutes before serving.

BANANA ZUCCHINI BREAD MUFFINS

Yields: 18 Muffins | Prep Time: 15 minutes | Total Time: 40 minutes

Ingredients:

*Note: Some people like to add Xanthum Gum to their recipes using gluten free flour, but I don’t believe it’s totally necessary if you’re making muffins. The label on Bob Mills Gluten Free Flour has instructions on how much Xanthum Gum to add if you wish to try it.

Directions:

  1. Preheat oven to 375º. Line two muffin pans with 18 baking cups.
  2. In a large bowl, whisk together flour, baking soda, and salt.
  3. In another large bowl, mix together melted butter, sugar, egg and egg yolk, sour cream, and vanilla. Add mashed bananas and grated zucchini and stir until combined. Gradually add dry ingredients to wet ingredients until just combined. 
  4. Fold in mini chocolate chips and transfer to prepared muffin pan cups.
  5. Bake until a toothpick comes out clean, about 25 minutes. Let cool 10 minutes in pan, then turn out onto a cooling rack to cool completely.

I’d love to hear what you think of this recipe! I’ve had so much fun making (and eating!) these Banana Zucchini Bread Muffins that I’m determined to add zucchini to other favorite recipes! What should I try next: a chocolate-zucchini cake, blueberry-zucchini muffins or chocolate chip-zucchini cookies?! Let me know in the comments below, or connect with me on Instagram or TikTok!

AFFILIATE DISCLOSURE: Some of this post contains affiliate links for the products I use and LOVE. If you take action on these links (like clicking, buying, etc.), I may receive compensation at no cost to you. As always, all opinions are my own, and I’ll only recommend what I truly love. For more information about affiliates and your privacy, view our Terms & Conditions page here.

Chocolate Peanut Butter Pecan Cookies – My Favorite Easy Cookie Recipe With Only 5 Ingredients!

Holidays, Kitchen, Lifestyle

‘Tis the season for holiday baking!

Baking these easy cookies with my son!

During the holidays when I was growing up, the kitchens of the women in my family were always filled with fresh baked goodies. I guess that’s why when Dec. 1 rolls around, I get an itch my bones to start baking! I especially love baking my grandmothers’ recipes to honor their tradition. After sharing a couple treats with our family, my favorite thing to do is box up the goodies to share with neighbors as a holiday gift. It’s been a great activity to do with my toddler, too! He loves helping me in the kitchen, and he also gets to experience the joy of giving a homemade gift to people we care about.

As I’ve chatted with a few of my mom friends the last couple of holiday seasons, it’s come to my attention that the tradition of holiday baking is slowly dying. We either don’t want easily accessible sugar tempting us in our kitchens, don’t have the time to bake, or simply don’t have the interest!

Then comes along that one person in your office or friend group who suggests a holiday cookie exchange… Or, your friend last-minute asks you to bring a homemade treat to share at her holiday party… Or, you need a quick thoughtful gift for a child’s teacher or a special person on your gift list you accidentally forgot to shop for…

Don’t worry, girl, I got you with this SUPER EASY Chocolate Peanut Butter Pecan Cookies recipe!! It’s made with only 5 ingredients and takes around 20 minutes to make! Yummy crunchy peanut butter, chocolate chips, chopped pecans, sugar and eggs are what it takes to make these gooey, loaded cookies! And, these cookies taste SO GOOD that people will think you’ve slaved in the kitchen for hours making them from scratch… But, only you and I know that it only took 20 minutes!

My Grandmother Holmes always had these at her house around Christmastime. Every year, the day after Christmas, we would drive from Texas to go visit her in Tennessee and stay with her for several days. Our family always enjoyed snacking on these cookies at her home, so my mother got her recipe and I’ve been baking them every holiday season since! I’ll also make them a couple other times throughout the year for quick “I’m thinking of you” gifts – great for new mamas (did anyone else get a sweet tooth right after giving birth?), get-well-soon gifts, and simple thank-you’s!

Another pro about these cookies – they’re gluten-free! I like to convince myself they’re healthier gluten-free, so I can have two instead of just one! ‘Tis the season, right?!

Chocolate Peanut Butter Pecan Cookies

RECIPE: Chocolate Peanut Butter Pecan Cookies

These flavorful cookies are gooey and loaded with crunchy peanuts and pecans! The sweetness from the semi-sweet chocolate chips make them perfect for a holiday treat – or anytime!

Prep Time: 5 minutes | Cooking Time: 12-15 minutes | Total Time: 20 minutes

Makes around 22-24 cookies

Ingredients:

-2 eggs blended

-1 cup sugar

-1 cup crunchy peanut butter

-1 cup chopped pecans

-1 cup chocolate chips (I like to use Ghirardelli Semi-Sweet Premium Chips)

Directions:

  1. In a large bowl, mix together eggs and sugar until combined.
  2. Stir in peanut butter, chips and nuts.
  3. Drop by tablespoon on parchment paper lined cookie sheet.
  4. Bake at 350 degrees for 12-15 minutes until edges are brown
  5. Cool and serve.

Put a few cookies in these festive treat bags with a Christmassy bow to share with neighbors, teachers, the mailman, friends, family, everybody!

Don’t forget to *kiss the cook!*

Let me know if you plan to make these cookies by commenting below or connecting with me on Instagram!

Happy Holidays!

XO Maggie

Yummy Gooey Crunchy Chocolate Peanut Butter Pecan Cookies!

AFFILIATE DISCLOSURE: Some of this post contains affiliate links for the products I use and LOVE. If you take action on these links (like clicking, buying, etc.), I may receive compensation at no cost to you. As always, all opinions are my own, and I’ll only recommend what I truly love. For more information about affiliates and your privacy, view our Terms & Conditions page here.