Famous 5-Minute Chocolate Chip Cookies Recipe

Cooking

AFFILIATE DISCLOSURE: Some of this post contains affiliate links for the products I use and LOVE. If you take action on these links (like clicking, buying, etc.), I may receive compensation at no cost to you. As always, all opinions are my own, and I’ll only recommend what I truly like and recommend. For more information about affiliates and your privacy, view our Terms & Conditions page here.

The best cookies!

Who doesn’t love a chocolate chip cookie?! That’s right, everybody loves the cookie classic! And, if they say they don’t, I wouldn’t trust them… Or, maybe I would just let them try one of my chocolate chip cookies to help change their mind!

One of the coolest things about chocolate chip cookies is that there’s so many different ways to make and serve them… large, small, soft, gooey, crunchy, thin, fat and with semi-sweet chocolate, milk or dark chocolate… You can even add nuts, sprinkles, candy or dried fruit… But, then is it still a classic chocolate chip cookie? Probably not…

freshly baked famous 5-minute chocolate chip cookies

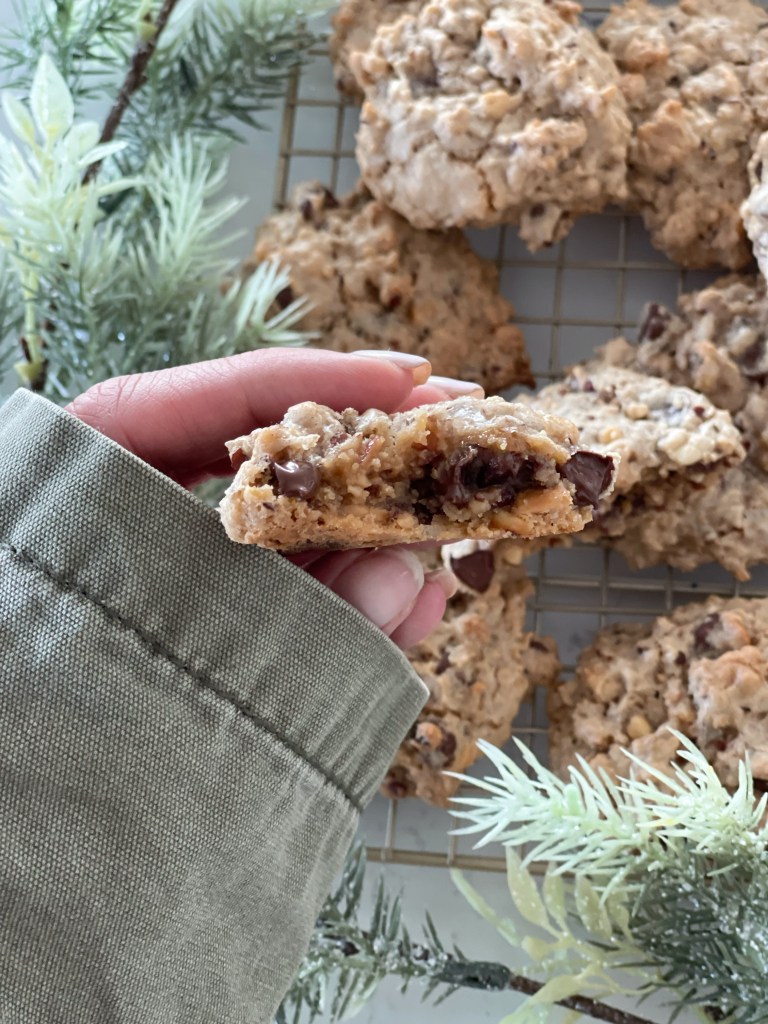
Anyway, let me tell you about my FAMOUS 5-MINUTE CHOCOLATE CHIP COOKIES! Now, these are “mini” chocolate chip cookies (about 1.5 inches in diameter), so, it’s okay if you want to eat more than one! In fact, they’re so yummy you can’t help but eat more than one! These mini chocolate chip cookies are also crunchy on the outside but a bit gooey on the inside, which is the ideal texture for a cookie, in my opinion. And, they’re topped with flakey sea salt for that perfect sweet-savory combo finish! The very best part? They only take 5 minutes to bake!

So, I told you these cookies are famous, and they are very well known… in my house. Yeah, I haven’t received any outside awards or special recognition for my 5-minute cookies, but if you make these for your fam, I promise that you, too, will be the most famous person in your house!

The recipe is so easy that my kids love to help me make them, too! My children especially love that they don’t take long to make, so we go from cooking to consuming much faster compared to other classic chocolate chip cookie recipes.

My kids love these cookies!

What ingredients do I need for 5-minute chocolate chip cookies?

Standard chocolate chip cookie ingredients are what you’ll need on hand, like butter, brown sugar, granulated sugar, egg, vanilla extract, flour, salt, baking soda and chocolate chips. What makes this recipe stand out compared to other chocolate chip cookies is the type of chocolate I like to use: Hu No Sugar Added Chocolate Chips. I’m a big fan of using as much natural ingredients as possible, and I love that Hu’s baking chocolate is made with just four simple ingredients: organic fair-trade cacao, organic date, organic fair-trade cocoa butter and organic fair-trade vanilla bean. Unlike competitor chocolate chips, Hu has no added sugar, sugar alcohols, lecithins/gums or dairy, and it is keto, paleo and organic certified.

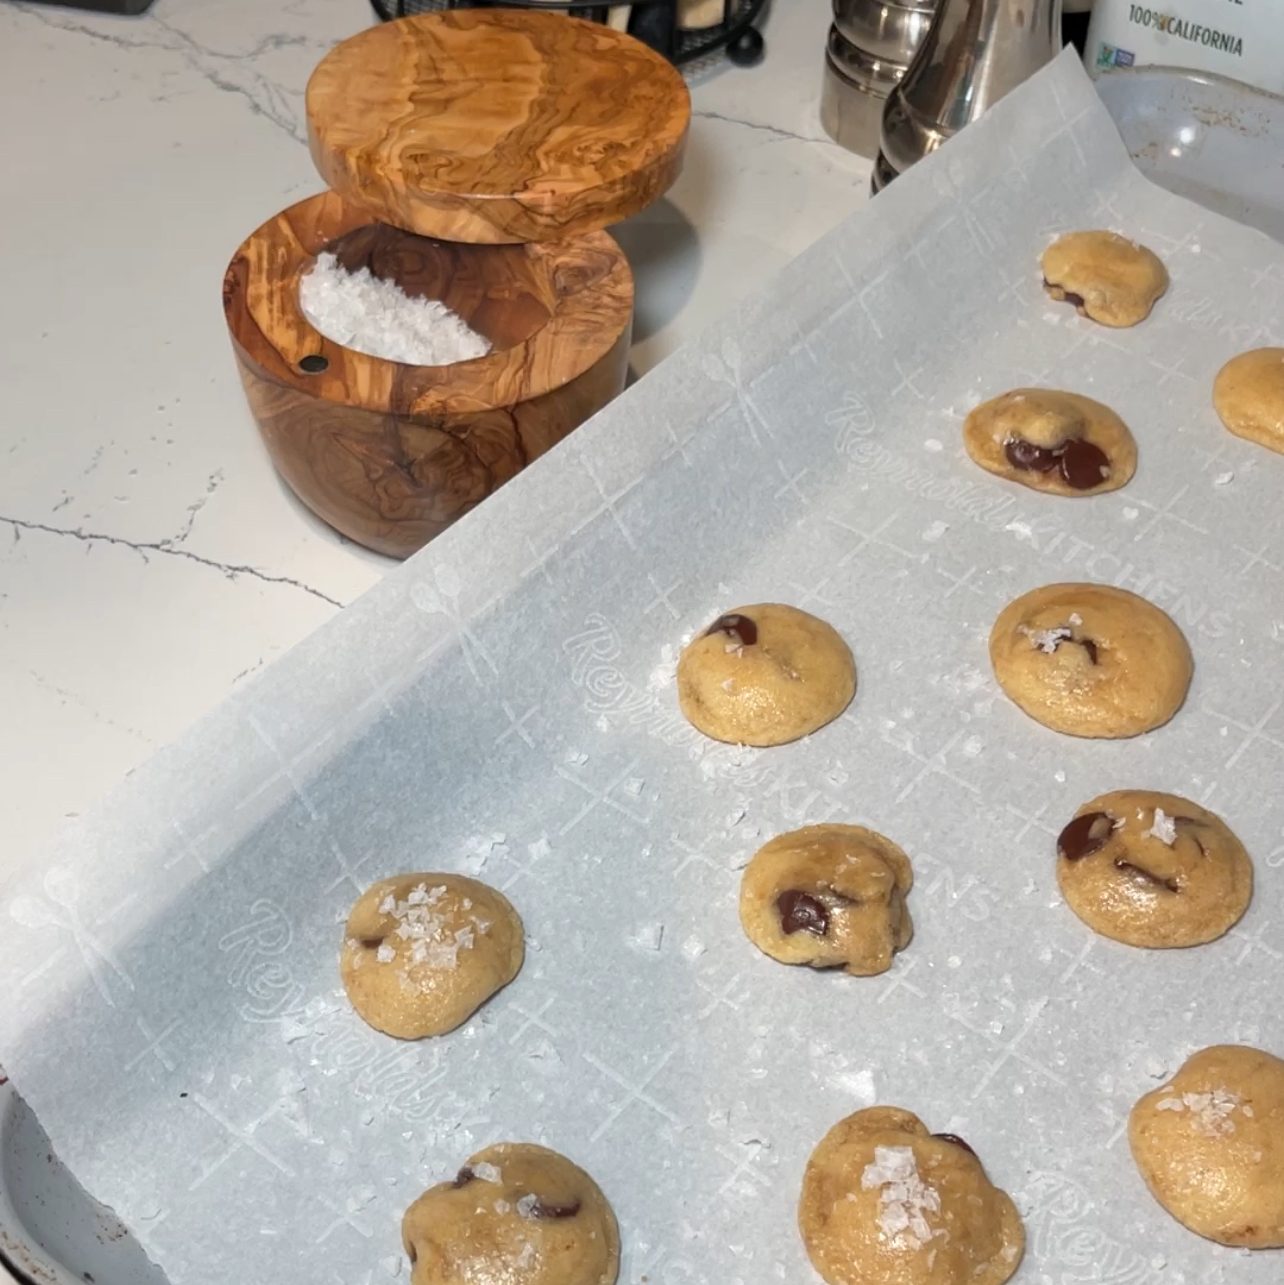
Another yummy bonus of these chocolate chip cookies is the small dash of flakey sea salt on top! I was gifted this chic olive wood salt cellar for Christmas, and I’m obsessed! While this is totally not required to make these cookies, a salt cellar is such a chic way to hold your flakey sea salt!

Add flakey sea salt halfway through baking

What kitchen tools do I need to make 5-minute chocolate chip cookies?

This recipe makes a lot of cookies (our last batch made 95 mini cookies!!), so you’ll want more than one baking pan so you’re not waiting to use the same one over and over again while each batch is cooking. My favorite bakeware set is from Caraway, which comes with 11 pieces for all your baking needs. If you’re not ready to commit to a full bakeware set, Caraway’s Baking Sheet Duo is perfect for making these cookies. First of all, the bakeware is absolutely beautiful. I got the “Iconics Black” color, and it looks so pretty in my kitchen and gives my brain a little boost of happiness when I use it. But, most importantly, it’s the best functioning bakeware I’ve ever used. My favorite part is that it’s the easiest to clean bakeware I’ve ever used with its non-stick coating, which is also non-toxic!

You’ll also need a good mixing bowl. I have adored and gotten so much use out of this 10-piece mixing bowl set. You do not need a mixer, so that’s another easy thing about these cookies! Lastly, you’ll want measuring cups and spoons. It’s time for me to upgrade my measuring tools, so I’m currently lusting after this 22-piece measuring cups and spoon set because it comes with everything you could possibly need!

Success tips for making the best 5-minute chocolate chip cookies:

  1. Keep them small – This recipe is designed to make small cookies, so do not use anymore than 1 teaspoon of dough to make each cookie.
  2. Roll the cookies into a ball – Don’t simply scoop and drop. Use your hands to roll the dough into a perfect tiny ball.
Make sure only 1 teaspoon of dough is rolled into a ball

RECIPE: Easy 5-Minute Chocolate Chip Cookies

Ingredients:

Directions:

  1. Preheat oven to 375°F. In a large mixing bowl, stir melted butter, granulated sugar, brown sugar, egg and vanilla extract until well combined.
  2. To the same mixing bowl, add flour, salt and baking soda into the same bowl, and stir to combine. Lastly, stir in chocolate chips.
  3. Line baking sheets with parchment paper. Use a teaspoon to scoop dough and roll into a ball. Place cookie dough balls prepared baking sheet, about 12-14 per sheet. Bake for 3 minutes. Remove cookies from oven and add small pinches of flakey sea salt to each cookie. Bake for remaining 2-3 minutes. Do not worry if the centers look soft, as the cookies will continue to set as they cool. Wait about 10 minutes to cool, then transfer to wire rack to cool completely. Enjoy!

Watch us make our famous mini chocolate chip cookies here:

I can’t wait to hear what you think of my famous 5-minute chocolate chip cookies! Let me know if you tried them in the comments below. Be sure to connect with me on Instagram and TikTok, too, for more easy recipes, family product ideas and entertaining tips!

XO Maggie

How To Make A Holiday Treat Board

Cooking, Holidays, Kitchen, Lifestyle

I love hosting a good themed party, so a holiday themed treat board is right up my alley! I’ve recently created two treat boards for St. Patrick’s Day and Easter, and I’m having so much fun that I can’t wait to make more for future holidays, birthdays and other celebrations! The best part? They’re SO EASY! Much easier than intricate charcuterie boards!

St. Patrick’s Day Charcu-TREAT Board!

To Love or Hate Charcuterie Boards? Beautiful charcuterie boards have been trending for a couple years now, and as someone who loves entertaining, I couldn’t help but jump on the charcuterie board bandwagon! Who can resist a decadent board of fine cheeses, quality meats, and all the yummiest snack pairings and accompaniments?! Plus, these boards are gorgeous to admire and make for the perfect photo-worthy party centerpiece!

I’ve loved putting together charcuterie boards for gatherings, but during our last family-friendly party at our house, I realized that the process can often be more time consuming than I’d like. Slicing the cheeses, arranging the board, thoughtfully considering the correct salty-to-savory-to-sweet pairings… I was getting a little bogged down by the process. Plus, if you choose high-quality meats and cheeses, a charcuterie board, which is often viewed as an appetizer, can cost as much as cooking a group dinner! During our party, guests hovered around the charcuterie board (score!), took photos of it, and snagged bites in between socializing and chasing their kiddos in and out of our backyard. At the end of the party, I noticed that no one hardly touched the honeycomb, dried fruit or olives, and what was left of the cheeses and meats had been sitting out for hours and not worth saving. Only a few of the children ate some cheese and crackers, but most of them didn’t have a palette for bold Roquefort yet. My charcuterie board was beautiful for the adults… but was it worth it?

Enter the charcu-TREAT board!! For St. Patrick’s Day this year, I decided to try something a little different… A dessert board! And, boy, did I have fun getting creative with this one! I went to my favorite spots for holiday treats – See’s Candies and Target – and pulled together a fruit and dessert board reminiscent of a rainbow and gold. Like a traditional charcuterie board, it was the center of the party, but this time it got eaten!! It cost me half the price of what it would to put together a fancy cheese board and was more festive for St. Paddy’s Day than charcuterie! Now, treat boards are a trend I can stand FIRMLY behind!

Easter Treat Board

Tips for Putting Together a Charcu-TREAT Board:

  1. Choose a large board – You can use a classic cheese board in a rectangle or round shape, or choose a tray to keep the treats from rolling off your board. Holiday themed serving platters, like this Easter platter, makes the treat board extra fun and festive!
  2. Pick a color scheme – This is easy for holidays, like St. Patrick’s Day, Easter, Fourth of July, Halloween and Christmas. For other celebrations, have the treat board match your party decor colors. For example, if you’re hosting a Spiderman themed kids birthday, look for red, blue and black candies and sweet snacks.
  3. Incorporate party decor – To add some festive flair and help fill space on your board, incorporate leftover decor that you’re already using for the party. For example, I used Easter grass on my Easter board. You also could add a porcelain bunny!
  4. Choose a variety of candies, chocolate and sweet snacks – Candies could include jelly beans, sour straws, gummy bears; Chocolate could include M&Ms, wrapped chocolates, chocolate covered almonds; Sweet snacks can include fruit, cookies, rice crispy treats, or chocolate dipped pretzels, cookies.
  5. Have one or two homemade items – One of the benefits of a treat board is little to no prep work, but to make the boards special, I like to add one or two homemade items, like chocolate dipped rice crispy treats or cookies in cutout shapes that fit the theme of the party.
  6. Utilize small bowls – Make the board interesting by incorporating two or three bowls filled with candy. This also is a good way to corral smaller candies into one place.

Steps to Put Together a Treat Board:

  1. Gather a board and 2-3 small bowls, along with sweets, treats and decor you wish to use for your board.Ideas for boards, candy, chocolate and sweet snacks are listed at the bottom of this post!
  2. Place the small bowls and whatever else you want to be the centerpiece on your board. For example, on the Easter board, I put the small bowls and the chocolate Easter bunny on the board first. For the St. Patrick’s Day board, I made the fruit rainbow first.
  3. Add larger items, like cookies, brownies, rice crispy treats, etc. Arrange them in fun ways to add visual interest, like rows, fanned, or a pattern. These larger items are also great for creating barriers for the smaller items to stay in place on the board.
  4. Fill in the rest of the board with smaller treats, like jelly beans, marshmallows and M&Ms, and pay attention to color distribution.
  5. Add small spoons to bowls and offer small plates or cups next to the board for guests to take their favorite treats with them!

Voila! Kids and adults alike will go nuts over a fun themed treat board!

Board Ideas:

  1. West Elm Mixed Marble & Wood Preston Cheese Boards – Feel fancy with marble!

2. Williams Sonoma Boska Oak Rectangular Cheese Board Medium – A classic, gorgeous oak board!

3. Pottery Barn Connor Ash Wood Tray – I like to use trays with edges to keep all the treats in one place. This makes the board easier to move, if needed, without candies rolling off the sides.

4. Texas Shaped Catskill Craftsmen, Inc. Wood Cutting Board – A board in the shape of your state could be great for any gathering!

5. Threshold Wood Bunny Serving Board – How fun would this be for a special Easter treat board!

Board Accessories Ideas:

  1. West Elm Minimal White Ramekins – I love these ramekins to add a modern look to the treat board.

2. Pottery Barn Hammered Nut Bowl – A gorgeous bowl for smaller treats!

3. Libbey Small Glass Bowls with Lids – Corral smaller treats into these easy, inexpensive bowls!

4. CB2 Gold Cocktail Spoons – Gorgeous gold spoons really elevate the board. Use these for guests to scoop up little treats, like M&M’s and marshmallows.

5. Stainless Steel Mini Spoons – Add some drama with black stainless steel!

Homemade Treat Ideas:

Store Bought Treat Ideas:

I’d love to hear your ideas for future treat boards! Share your favorite treat board goodies or theme ideas in the comments below! Be sure to follow me on Instagram and TikTok for more fun family-friendly ideas!

XO Maggie

AFFILIATE DISCLOSURE: Some of this post contains affiliate links for the products I use and LOVE. If you take action on these links (like clicking, buying, etc.), I may receive compensation at no cost to you. As always, all opinions are my own, and I’ll only recommend what I truly love. For more information about affiliates and your privacy, view our Terms & Conditions page here.

Chocolate Peanut Butter Pecan Cookies – My Favorite Easy Cookie Recipe With Only 5 Ingredients!

Holidays, Kitchen, Lifestyle

‘Tis the season for holiday baking!

Baking these easy cookies with my son!

During the holidays when I was growing up, the kitchens of the women in my family were always filled with fresh baked goodies. I guess that’s why when Dec. 1 rolls around, I get an itch my bones to start baking! I especially love baking my grandmothers’ recipes to honor their tradition. After sharing a couple treats with our family, my favorite thing to do is box up the goodies to share with neighbors as a holiday gift. It’s been a great activity to do with my toddler, too! He loves helping me in the kitchen, and he also gets to experience the joy of giving a homemade gift to people we care about.

As I’ve chatted with a few of my mom friends the last couple of holiday seasons, it’s come to my attention that the tradition of holiday baking is slowly dying. We either don’t want easily accessible sugar tempting us in our kitchens, don’t have the time to bake, or simply don’t have the interest!

Then comes along that one person in your office or friend group who suggests a holiday cookie exchange… Or, your friend last-minute asks you to bring a homemade treat to share at her holiday party… Or, you need a quick thoughtful gift for a child’s teacher or a special person on your gift list you accidentally forgot to shop for…

Don’t worry, girl, I got you with this SUPER EASY Chocolate Peanut Butter Pecan Cookies recipe!! It’s made with only 5 ingredients and takes around 20 minutes to make! Yummy crunchy peanut butter, chocolate chips, chopped pecans, sugar and eggs are what it takes to make these gooey, loaded cookies! And, these cookies taste SO GOOD that people will think you’ve slaved in the kitchen for hours making them from scratch… But, only you and I know that it only took 20 minutes!

My Grandmother Holmes always had these at her house around Christmastime. Every year, the day after Christmas, we would drive from Texas to go visit her in Tennessee and stay with her for several days. Our family always enjoyed snacking on these cookies at her home, so my mother got her recipe and I’ve been baking them every holiday season since! I’ll also make them a couple other times throughout the year for quick “I’m thinking of you” gifts – great for new mamas (did anyone else get a sweet tooth right after giving birth?), get-well-soon gifts, and simple thank-you’s!

Another pro about these cookies – they’re gluten-free! I like to convince myself they’re healthier gluten-free, so I can have two instead of just one! ‘Tis the season, right?!

Chocolate Peanut Butter Pecan Cookies

RECIPE: Chocolate Peanut Butter Pecan Cookies

These flavorful cookies are gooey and loaded with crunchy peanuts and pecans! The sweetness from the semi-sweet chocolate chips make them perfect for a holiday treat – or anytime!

Prep Time: 5 minutes | Cooking Time: 12-15 minutes | Total Time: 20 minutes

Makes around 22-24 cookies

Ingredients:

-2 eggs blended

-1 cup sugar

-1 cup crunchy peanut butter

-1 cup chopped pecans

-1 cup chocolate chips (I like to use Ghirardelli Semi-Sweet Premium Chips)

Directions:

  1. In a large bowl, mix together eggs and sugar until combined.
  2. Stir in peanut butter, chips and nuts.
  3. Drop by tablespoon on parchment paper lined cookie sheet.
  4. Bake at 350 degrees for 12-15 minutes until edges are brown
  5. Cool and serve.

Put a few cookies in these festive treat bags with a Christmassy bow to share with neighbors, teachers, the mailman, friends, family, everybody!

Don’t forget to *kiss the cook!*

Let me know if you plan to make these cookies by commenting below or connecting with me on Instagram!

Happy Holidays!

XO Maggie

Yummy Gooey Crunchy Chocolate Peanut Butter Pecan Cookies!

AFFILIATE DISCLOSURE: Some of this post contains affiliate links for the products I use and LOVE. If you take action on these links (like clicking, buying, etc.), I may receive compensation at no cost to you. As always, all opinions are my own, and I’ll only recommend what I truly love. For more information about affiliates and your privacy, view our Terms & Conditions page here.