AFFILIATE DISCLOSURE: Some of this post contains affiliate links for the products I use and LOVE. If you take action on these links (like clicking, buying, etc.), I may receive compensation at no cost to you. As always, all opinions are my own, and I’ll only recommend what I truly like and recommend. For more information about affiliates and your privacy, view our Terms & Conditions page here.
We’re a big banana bread family. During the Covid-19 pandemic, I made one banana bread for every month that the city of Los Angeles was in “lockdown.” I think I made six banana breads, maybe more, as the city continued on with various restrictions. With all that baking, I was able to perfect the BEST chocolate chip zucchini banana bread recipe ever. You can find a version of that recipe as muffins with healthier swaps for flour and sugar here.
Today, we went to make that amazing bread recipe and realized that we didn’t have zucchini on hand. However, we did have shredded carrots, which I thought was even better with the Easter holiday upon us! The result was even better than expected. This banana bread with chocolate chips and carrots is gooey on the outside with a lightly crispy top, and the flavor is both sweet and savory, making it a perfect bread for breakfast, snacks, desserts, and a yummy treat to pair with coffee or tea.
If you’re like me and always looking for ways to sneak veggies into your kids’ food, then this is the perfect recipe for you! My kids are usually veggie adverts, and they devoured this chocolate chip banana carrot bread! My 3-year-old daughter also loved helping me make this recipe. She was the “official banana masher.”
This is a great recipe for your family, and I know you’ll love it! If you kids asked who ate it all, you can just say the “Easter Bunny!”
Preheat oven to 350º. Line a 9-inch bread loaf pan with parchment paper.
In a large bowl, mix together melted butter, sugar, egg and egg yolk, sour cream, and vanilla. Add mashed bananas and shredded carrots and stir until combined.
In the same bowl, add flour, baking soda, and salt and stir to combine well.
Fold in chocolate chips and transfer to prepared baking pan.
Bake until a toothpick comes out clean, about 1 hour. Let cool 10 minutes in pan, then transfer onto a cooling rack to cool completely.
I hope you love this recipe! Let me know if you try it in the comments below, or connect with me on Instagram or TikTok!
AFFILIATE DISCLOSURE: Some of this post contains affiliate links for the products I use and LOVE. If you take action on these links (like clicking, buying, etc.), I may receive compensation at no cost to you. As always, all opinions are my own, and I’ll only recommend what I truly like and recommend. For more information about affiliates and your privacy, view our Terms & Conditions page here.
The best cookies!
Who doesn’t love a chocolate chip cookie?! That’s right, everybody loves the cookie classic! And, if they say they don’t, I wouldn’t trust them… Or, maybe I would just let them try one of my chocolate chip cookies to help change their mind!
One of the coolest things about chocolate chip cookies is that there’s so many different ways to make and serve them… large, small, soft, gooey, crunchy, thin, fat and with semi-sweet chocolate, milk or dark chocolate… You can even add nuts, sprinkles, candy or dried fruit… But, then is it still a classic chocolate chip cookie? Probably not…
freshly baked famous 5-minute chocolate chip cookies
Anyway, let me tell you about my FAMOUS 5-MINUTE CHOCOLATE CHIP COOKIES! Now, these are “mini” chocolate chip cookies (about 1.5 inches in diameter), so, it’s okay if you want to eat more than one! In fact, they’re so yummy you can’t help but eat more than one! These mini chocolate chip cookies are also crunchy on the outside but a bit gooey on the inside, which is the ideal texture for a cookie, in my opinion. And, they’re topped with flakey sea salt for that perfect sweet-savory combo finish! The very best part? They only take 5 minutes to bake!
So, I told you these cookies are famous, and they are very well known… in my house. Yeah, I haven’t received any outside awards or special recognition for my 5-minute cookies, but if you make these for your fam, I promise that you, too, will be the most famous person in your house!
The recipe is so easy that my kids love to help me make them, too! My children especially love that they don’t take long to make, so we go from cooking to consuming much faster compared to other classic chocolate chip cookie recipes.
My kids love these cookies!
What ingredients do I need for 5-minute chocolate chip cookies?
Standard chocolate chip cookie ingredients are what you’ll need on hand, like butter, brown sugar, granulated sugar, egg, vanilla extract, flour, salt, baking soda and chocolate chips. What makes this recipe stand out compared to other chocolate chip cookies is the type of chocolate I like to use: Hu No Sugar Added Chocolate Chips. I’m a big fan of using as much natural ingredients as possible, and I love that Hu’s baking chocolate is made with just four simple ingredients: organic fair-trade cacao, organic date, organic fair-trade cocoa butter and organic fair-trade vanilla bean. Unlike competitor chocolate chips, Hu has no added sugar, sugar alcohols, lecithins/gums or dairy, and it is keto, paleo and organic certified.
Another yummy bonus of these chocolate chip cookies is the small dash of flakey sea salt on top! I was gifted this chic olive wood salt cellar for Christmas, and I’m obsessed! While this is totally not required to make these cookies, a salt cellar is such a chic way to hold your flakey sea salt!
What kitchen tools do I need to make 5-minute chocolate chip cookies?
This recipe makes a lot of cookies (our last batch made 95 mini cookies!!), so you’ll want more than one baking pan so you’re not waiting to use the same one over and over again while each batch is cooking. My favorite bakeware set is from Caraway, which comes with 11 pieces for all your baking needs. If you’re not ready to commit to a full bakeware set, Caraway’s Baking Sheet Duo is perfect for making these cookies. First of all, the bakeware is absolutely beautiful. I got the “Iconics Black” color, and it looks so pretty in my kitchen and gives my brain a little boost of happiness when I use it. But, most importantly, it’s the best functioning bakeware I’ve ever used. My favorite part is that it’s the easiest to clean bakeware I’ve ever used with its non-stick coating, which is also non-toxic!
You’ll also need a good mixing bowl. I have adored and gotten so much use out of this 10-piece mixing bowl set. You do not need a mixer, so that’s another easy thing about these cookies! Lastly, you’ll want measuring cups and spoons. It’s time for me to upgrade my measuring tools, so I’m currently lusting after this 22-piece measuring cups and spoon set because it comes with everything you could possibly need!
Preheat oven to 375°F. In a large mixing bowl, stir melted butter, granulated sugar, brown sugar, egg and vanilla extract until well combined.
To the same mixing bowl, add flour, salt and baking soda into the same bowl, and stir to combine. Lastly, stir in chocolate chips.
Line baking sheets with parchment paper. Use a teaspoon to scoop dough and roll into a ball. Place cookie dough balls prepared baking sheet, about 12-14 per sheet. Bake for 3 minutes. Remove cookies from oven and add small pinches of flakey sea salt to each cookie. Bake for remaining 2-3 minutes. Do not worry if the centers look soft, as the cookies will continue to set as they cool. Wait about 10 minutes to cool, then transfer to wire rack to cool completely. Enjoy!
Watch us make our famous mini chocolate chip cookies here:
I can’t wait to hear what you think of my famous 5-minute chocolate chip cookies! Let me know if you tried them in the comments below. Be sure to connect with me on Instagram and TikTok, too, for more easy recipes, family product ideas and entertaining tips!
At the beginning of this year, I took a poll asking my Instagram followers what kind of recipes they’d like me to share. I asked my followers if they want to see: 1) Healthy meals; 2) Kids meals; 3) Party food to serve a crowd; 4) Quick meals (30 minutes or less). The majority requested to see “healthy meals” with “quick meals” falling shortly behind. Ask and you shall receive!! Or, in this case, vote in my poll and you shall receive! So, here I am, sharing a dinner recipe that is both healthy AND quick: One-Pan Chicken Fajitas!!
Where did this One-Pan Chicken Fajita Skillet recipe come from?
My husband and I are both originally from Texas, so Tex-Mex cuisine is a favorite in our household. However, Tex-Mex isn’t necessarily known for being healthy with its flour tortillas, extra cheese, butter and extremely large portions. When my husband and I started dating over a decade ago, we were relatively new to California and missed authentic Tex-Mex food. When I moved to Los Angeles, I was surprised to find that the Mexican restaurants here didn’t all serve sizzling skillet fajitas with flour tortillas, cheese, pico de gallo, sour cream, a side of charro beans with bacon, and our favorite… queso dip! In fact, when I arrived here in 2009, I could not find a Mexican restaurant that even knew what queso dip was! Most all of the restaurants only served corn tortillas and they rarely had the melty combinations of cheese in their fajitas and tacos, like monterey jack, queso blanco and colby jack. Compared to Tex-Mex, I thought Cali-Mex was, well, bland! I had to recreate our beloved Tex-Mex flavors at home, but there was another problem… My husband and I like to eat healthy! Okay, so that’s necessarily a problem, but it can be challenging when you love traditional Tex-Mex food! So, I was determined to create a healthy-ish version of some of our favorite Tex-Mex dishes, like chicken fajitas, and that’s how this recipe came about! We honestly eat this one-pan chicken fajitas meal at least 3-4 times per month… Actually, we eat it even more than that, because I’ll switch out the protein for carne asada, ground beef or ground turkey! You can make it even healthier by omitting or limiting the cheese. And, I always opt for a healthier tortilla, like Siete Foods Almond Flour Tortillas or Ole Xtreme Wellness Tortillas.
All the authentic Tex-Mex flavored goodness wrapped in a tortilla!
What kitchen equipment do I need to make One-Pan Chicken Fajitas?
Just as the recipe name implies, all you really need is one pan! For this recipe, I use the 10.5″ Caraway Fry Pan. Last year, I upgraded my cookware to Caraway, and it’s one of the best home investments I’ve made in a long time! I was worried about spending so much on cookware, but let me tell you, Caraway is worth it! It has a non-toxic coating, so you can feel good about making dinner for your family with the cookware without worrying about harmful chemicals. Plus, it’s non-stick and so easy to clean! Another thing that majorly separates Caraway from other cookware brands is its storage capabilities. I love that the 4-piece cookware set comes with pan racks and a lid holder to free up space in my cabinets and keep my kitchen organized and aesthetically pleasing. Practicality aside, I also adore how chic this cookware looks on my stove! I purchased the “iconic black” color, and the gold hardware is beautiful! It looks perfect in my modern black and white kitchen.
Another tool I loved adding to my kitchen this last year is this 8-Blade Chopper – perfect for chopping, dicing, mincing and julienning vegetables! My kids often like to help make dinner, and I like having this tool so they can help cut vegetables without using a big, sharp knife. And, it helps save time when you need to chop lots of vegetables! You can also use it to cut or crate cheese, fruit and eggs!
Okay, this next tool is a MUST-HAVE if you love guacamole or avocado toast: Williams-Sonoma Avocado Pitter & Masher! It’s designed to help you cut, pit and mash your avocados perfectly. Before I had this tool, I’d use a fork to mash my avocados, which was such a pain! I use this tool multiple times per week and consider it one of my kitchen essentials!
What Ingredients Do I Need for One-Pan Chicken Fajitas?
You can’t make chicken fajitas without, well, CHICKEN! I prefer to use chicken thighs for this recipe, but I’ve used chicken breasts plenty of times. Chicken thighs are a bit more flavorful. They’re also more affordable! You’ll also need a fresh bell pepper (my favorite is orange, but a red, green or yellow bell pepper works, too!) and red onion.
To give the chicken in this is recipe it’s authentic Tex-Mex flavor, I use Siete Mild Taco Seasoning. I love how versatile this seasoning is! I’ve used it for dips, and I’ve used it to make beef and turkey tacos, too!
To make authentic Tex-Mex fajitas, you need to wrap your chicken and veggies in a flour tortilla, but I like to swap out the flour tortillas for healthier options. My favorite tortillas are Siete Almond Flour Tortillas or Siete Cassava Flour Tortillas. Use Cassava Flour if you want a tortilla that’s closer to the taste of an original flour tortilla. However, I prefer Almond Flour tortillas because it has a faintly sweeter taste and it has more protein (6 grams!) per tortilla. Another favorite tortilla brand that I use often is Ole Xtreme Wellness Tortillas. I love that their high in fiber!
Watch me make One-Pan Chicken Fajitas on Instagram:
Mexican blend shredded cheese (I like Tillamook Mexican cheese)
Directions:
Add 2 tbsp avocado oil in skillet over medium-high heat, then add bell pepper and onion strips. Season with light salt if desired. Cook until soft, about 5-8 minutes. Remove veggies from pan and save for later.
Add remaining avocado oil to skillet if necessary. Add chicken to pan and cook through, about 8-10 minutes.
Add packet of Siete Mild Taco seasoning to chicken and 1/3 cup water. Stir to combine well.
Add bell pepper and onion back to skilett with chicken and stir to combine.
Add chicken to warmed tortilla. Top with cheese, avocado dip, salsa, taco sauce and any other preferred toppings. Enjoy!
It’s Thanksgiving prep time, and I’m whipping up my favorite dishes in advance so that I don’t have to scramble the day of Thanksgiving to get the big feast on the table. As the host, I want to enjoy the day with my guests instead of spending all my time in the kitchen.
Enter the casseroles… Would it even be Thanksgiving without casseroles?! I love that you an make casseroles ahead of time, so Thanksgiving day can be a bit more enjoyable.
I grew up in the South, and the Southern women I knew growing up loved a casserole. I specifically remember one ginormous Thanksgiving I went to where everyone was asked to bring a dish and almost every single dish was a casserole except the turkey. Seriously, I’ve never seen so many casseroles! Green bean, corn souffle, au gratin potato, sweet potato, macaroni, broccoli and cheese, 10 different versions of dressing… it was a sight!
Now, I understand that some people despise casseroles. I mean, I get it. If you grew up eating casseroles at potluck dinners in the South, there is a strong chance that you’ve had some yucky casseroles! But, as someone who loves cooking for the selfish reason of wanting to eat tasty food, I have made it a priority to make my Thanksgiving casserole recipes yummy!
The best part about Thanksgiving casseroles? Most of them can be made and frozen weeks before the holiday to help eliminate cooking on the actual T-Day. Simply take them out of the freezer the night before to thaw in the fridge and reheat in the oven.
If you’re looking for a tried and true Thanksgiving side dish, I’ve shared a list of my favorite casseroles below!
This was my favorite Thanksgiving side growing up, and I’m certain that’s because it tasted more like dessert than a vegetable. I’ve never been a fan of adding marshmallows to the sweet potato casserole, though. That’s just too dessert-like. This dish from Food Network is simple to make and a perfect accompaniment to your holiday meal. Find the full recipe here.
When I was a kid, my mother taught me that Southern Living ALWAYS has the best recipes. So far, she’s been right. I’ve yet to try a recipe from the premier southern magazine that hasn’t been delicious. Just like this Bacon-Brussels Sprout-Green Bean Casserole. I grew up only eating green bean casserole at Thanksgiving but have taken to loving brussels sprouts in my adult years, so I love that this recipe combines them. Plus, every dish with bacon is better! This recipe calls for frozen green beans, but I like to use fresh. Find this full recipe here.
PHOTO: VICTOR PROTASIO; PROP STYLING: GINNY BRANCH STELLING; FOOD STYLING: EMILY NABORS HALL
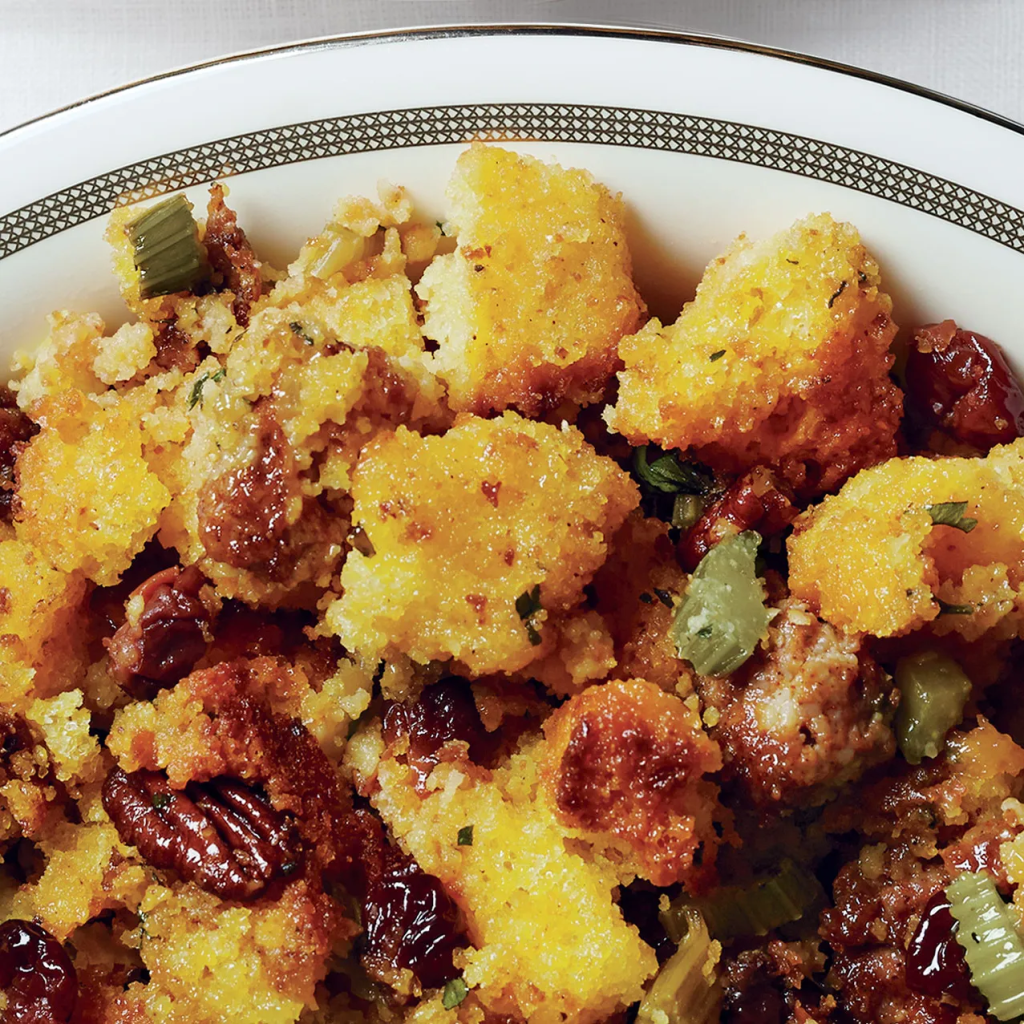
When I first hosted Thanksgiving a decade ago, I was really interested in impressing my guests with some stellar sides. My foodie co-worker recommended this cherry-chorizo stuffing recipe to me, and it did not disappoint! I’ve always preferred cornbread stuffing, and the pecans are reminiscent of the dressing I ate growing up. Get the full recipe from Bon Appetit here.
I have a confession… I don’t really love mashed potatoes! I’ve always found them to be a bit bland. A loaded baked potato with bacon, butter and cheese, though? Heck yes! That’s why I love this Mashed Potato Casserole — its a combination of mashed potatoes and a loaded baked potato in one! So creamy and so delicious! Get the full recipe from House of Yumm here.
Mashed Potato Casserole from House of Yumm
There you have it, folks! These are the Thanksgiving casseroles I swear by and the ones our family enjoys each year.
Let me know in the comments below which of these you’d like to try! Connect with me on Instagram and TikTok for more easy recipes and family-friendly holiday ideas.
After I gave birth to my firstborn, my neighbor brought over a quiche, and I thought it was the best postpartum food gift ever! Quiche is good for breakfast, lunch, dinner or even a snack, and it was amazing not to worry about cooking or ordering food in those first few days home with a newborn!
I appreciated that postpartum quiche so much that I now I try to give a quiche to all my mama friends with a newborn. This classic Quiche Lorraine recipe is my go-to, because it’s so easy and absolutely delicious. Salty bacon, fluffy eggs, creamy gruyere cheese and a flaky pie crust make this quiche a real winner. I like to use a frozen pie crust to cut time and make this recipe even simpler!
The quiche I made from the recipe below (adapted from Delish.com) is headed to one of my mama friends, and I doubled the recipe to have one for our family.
Easy Classic Quiche Lorraine
Ingredients:
1 9-inch pie crust, frozen
8 slices bacon
1 1/2 cups shredded Gruyère, divided
1 shallot, minced
6 large eggs
1 1/2 cups heavy cream
Pinch of cayenne
Pinch of nutmeg
Kosher salt
Freshly cracked black pepper
Chopped green onion (optional)
Directions:
Preheat oven to 375°. Allow frozen pie crust to thaw for 10-20 minutes. Use a fork to prick holes around the bottom and sides of the crust. Bake for 5-10 minutes.
While pie crust is baking, cook bacon until crispy in a skillet over medium heat, about 8 minutes. Transfer to a paper towel-lined plate to drain.
Scatter cooked bacon on pie crust with 1 cup Gruyère, shallot and green onions.
In a large bowl, whisk together eggs, cream, cayenne, and nutmeg and season with salt. Pour mixture over bacon and cheese. Sprinkle with remaining 1/2 cup cheese.
Bake until crust is golden and eggs cooked through, 40 minutes. Let cool 15 minutes before slicing and serving. Enjoy!
What other variations of quiche do you like? Let me know in the comments below if you try this recipe! Or, connect with my on Instagram and TikTok!
AFFILIATE DISCLOSURE: Some of this post contains affiliate links for the products I use and LOVE. If you take action on these links (like clicking, buying, etc.), I may receive compensation at no cost to you. As always, all opinions are my own, and I’ll only recommend what I truly like and recommend. For more information about affiliates and your privacy, view our Terms & Conditions page here.
I recently had my wisdom teeth extracted, so smoothies have been my morning go-to to get optimal nutrition while avoiding chewing. I was getting bored of my usual fruit smoothies so started testing out different recipes, and I believe I have perfected the best avocado smoothie! Scroll down to get the recipe, and be sure to read to the bottom to get my comfy morning smoothie essentials!
Are avocados good in smoothies?
It might sound a bit odd to add an avocado to your smoothie, especially if you’re used to the typical smoothies with a banana base. But, let me assure you that the texture of avocado makes them perfect for creamy, rich smoothies – almost like a milkshake! The taste of avocado is super mild and we add fruit for sweetness, so you don’t end up with a smoothie that tastes like a raw avocado with this recipe. If you like your smoothies extra sweet, I recommend adding 1 tsp. of pure maple syrup to the recipe.
Are avocado smoothies good for you?
In addition to this avocado smoothie tasting great, it’s also jam-packed with health and beauty benefits! According to Medical News Today, avocados are a source of vitamins C, E, K, and B6, as well as riboflavin, niacin, folate, pantothenic acid, magnesium, and potassium. They also provide lutein, beta carotene, and omega-3 fatty acids, which is great for eye and brain health and improves bone and joint function. Avocados contain high levels of healthy, beneficial fats, which can help a person feel fuller between meals. I drink this smoothie in the morning, and it keeps me full until lunchtime! Omega-3’s are also known to regulate your skin’s oil production and boost hair growth, so this is truly a beauty-boosting smoothie!
What do I need to make an avocado smoothie?
My avocado smoothie recipe is made with only 4 ingredients! Or, 5 ingredients if you are adding protein powder, which I recommend! Some people like their smoothies on the sweeter side, so if that’s you, I also recommend adding 1 tsp. of pure maple syrup. Of course, you’ll need one ripe avocado – our star ingredient! You can tell its ripe by gently squeezing the avocado. If it’s soft, but not mushy, it’s ready to eat! You also need your preferred milk (I like Almond MALK), vanilla extract and frozen fruit. My favorite frozen fruit for this recipe is pineapple, mango or strawberries, because they give the smoothie that extra bit of sweetness that avocado is lacking. If you’re using protein powder, I recommend Tone It Up Plant-Based Protein + Greens Powder, because it has everything you want in one scoop:15 grams of protein, 14 leaves of kale, 4 leaves of spinach and a floret of broccoli with a creamy texture and delicious vanilla flavor. Plus, it’s plant-based protein, non-GMO, gluten free and kosher with nothing artificial! As mentioned before, avocados are quite bland, so if you want to kick up this smoothie’s flavor, add a dash of salt before blending.
You’ll also need a powerhouse blender, like my Ninja Professional Plus Blender, to make your smoothie, well, smooth. This blender has a powerful motor and extra sharp blades designed for superior crushing, so it’s perfect for creating your smoothies, frozen drinks or even ice cream! I personally love how easy it is to clean. And, it’s dishwasher safe!
After my smoothie is done, I like to pour it into a nice glass and drink with a fancy gold straw. It feels so much better than those yucky paper cups and straws you get at smoothie shops, ya know? Try it — I think you’ll love it served that way, too!
1 tsp. pure maple syrup (optional for added sweetness)
A dash of salt (optional)
Directions:
Peel the avocado, discard the pit and add into the blender. Add remaining ingredients into the blender and blend until smooth. Serve immediately.
Enjoy this easy, yummy avocado smoothie, beauties! Let me know what you think in the comments below, and be sure to follow me on Instagram and TikTok for more easy recipes!
Check out my comfy and beautiful morning essentials for the best smoothies:
These healthier red velvet cupcakes are everything you love about the original – sweet, chocolatey, moist cake with cream cheese frosting! We made these cupcakes for Valentine’s Day and topped with pink, red and heart-shaped sprinkles to make them festive! These cupcakes are so easy – only takes 30 minutes to make! – and they’re reduced sugar and protein packed! We reduced sugar with Truvia Sweet Complete Monk Fruit Sweetener but still used regular powdered sugar in the frosting. We upped the protein in these yummy cupcakes with King Arthur Keto Wheat Flour.
Ever since becoming a mom, what I eat and feed my family means so much more to me. I want overall good health and energy to care for my family, and I want my kids interested in eating more than just junk food. But, I never want to keep my family from enjoying celebrations and “party food” like cupcakes, so, recently, I’ve started looking into healthier swaps for refined sugar and flour.
A swap for sugar I’ve discovered is Truvia Sweet Complete Monk Fruit Sweetener, which is an easy 1:1 swap. Monk Fruit Extract is a calorie-free sweetener that comes from monk fruit, which is native to the mountains of China and Northern Thailand. This sweetener is zero calories and replaces sugar anywhere you’d normally use it – coffee, teas, baking, etc.
For an alternative to flour, I’ve enjoyed exploring King Arthur brand’s Keto Wheat Flour and Gluten-Free Flour, because they’re also an easy 1:1 swap in recipes. The Keto Wheat Flour is an awesome way to boost my kids protein intake with 17g of protein per serving. My family isn’t gluten-free, but I uncovered the health benefits of removing gluten from my diet when I did the Kroma Wellness 5-day reset (I’ll write a blog post about that later), so King Arthur Gluten-Free is also a great option.
Below is my recipe that I updated from the original Vegan Red Velvet Cupcakes recipe found on Peanut Butter and Jilly. My recipe is not vegan, but it’s delicious!
Mix together the almond milk, melted butter, monk fruit sweetener, cocoa powder, vanilla, baking powder, baking soda, and food coloring until well combined.
Add the flour to the bowl and mix until a thick batter forms. Spoon the batter into 12-14 lined cupcake molds and bake in the oven to 25 minutes.
While the cupcakes are baking, use an electric hand mixer to mix together the powdered sugar, cream cheese, and butter. If you desire a thicker frosting, add ¼ or more powdered sugar to the mixture until desired consistency is reached. Allow cupcakes to cool, then spread the frosting onto the cupcakes. Enjoy!
Let me know if you try these and what you think! Be sure to follow me on Instagram and TikTok for more easy recipes, healthy lifestyle and ideas for your family!
XO Maggie
AFFILIATE DISCLOSURE: Some of this post contains affiliate links for the products I use and LOVE. If you take action on these links (like clicking, buying, etc.), I may receive compensation at no cost to you. As always, all opinions are my own, and I’ll only recommend what I truly love. For more information about affiliates and your privacy, view our Terms & Conditions page here.
I’ll never forget the year I slaved over creating a gourmet Thanksgiving feast for my family and my 2-year-old son only ate a crescent roll. The audacity! Didn’t he know that I had been Pinning recipes for weeks, woke up at the crack of dawn to properly season and dress the turkey, and my cherry chorizo stuffing is the best ever?! Of course not — he was only 2!
Despite being a bit miffed at my son’s lack of interest in our Turkey Day meal, it made me rethink how I should prepare Thanksgiving moving forward. I realized he had no idea the amount of preparation that went into Thanksgiving. He didn’t yet know the traditional foods. How could I expect him to love green bean casserole when he doesn’t even like regular green beans? Right then and there, I decided I would involve my children in preparing our Thanksgiving meal next year, and I’d introduce more kid-friendly recipes!
Below are six kid-friendly Thanksgiving recipes that the whole family will love! These recipes give kids confidence in the kitchen and encourage picky eaters to enjoy their Thanksgiving meal. These delicious recipes are so easy that both kids and parents have stress-free fun in the kitchen, plus they have the joy of indulging in their scrumptious Thanksgiving meal together.
Be sure to scroll to the end for additional Thanksgiving meal preparation tips!
6 Kid-Friendly Thanksgiving Recipes The Whole Family Will Love:
Veggie Turkey Plate with Healthy Veggie Dip
The best way to get my kids to eat veggies is to introduce them first and make it fun! A veggie plate appetizer shaped like a turkey is sure to get your kids interested! Arrange cucumbers, carrots and celery for the turkey feathers and use bell peppers to create turkey wings and face. I like to pair veggies with my favorite Healthy Veggie Dip, which is so easy to make! Go to Favorite Family Recipes for tips on how to create the veggie turkey here.
Make Ahead Creamy Mashed Potatoes
What kid doesn’t love mashed potatoes? Make this elevated version of mashed potatoes using Cacique Oaxaca Cheese, Crema Mexicana, Pork Chorizo and bacon for a side dish that the whole family will love! Cacique brand makes my favorite hispanic foods, including their high-quality, authentic Oaxaca Cheese which has a mellow, earthy flavor with a superior melt. It’s the perfect cheese to add a special spark to your favorite dishes like classic mashed potatoes. My children love helping sprinkle the shredded Cacique Oaxaca Cheese as the final touch on the casserole, and my 4-year-old is great at mashing potatoes! Another thing that’s fabulous about this mashed potatoes recipe is that you can assemble it the day before Thanksgiving, then pop it in the oven for 30 minutes when you’re ready to serve. This makes the day easier to enjoy relaxing and visiting with family instead of stressing out in the kitchen. For more information about Cacique, including mouth-watering recipes made with authentic ingredients, head to www.CaciqueFoods.com. You can find this Make Ahead Creamy Mashed Potatoes recipe here.
Stuffins
Stuffins = stuffing muffins!! My kids always love making muffins with me, so why not make stuffing muffins! These are easy for little hands to eat and perfect for dipping in gravy or topping with mashed potatoes. I also love that stuffing in muffin form makes sending home leftovers easier. Just pop one of these in a to-go bag! Now you can eat one of everyone’s favorite Thanksgiving side dishes on-the-go! These stuffins are sure to be a big hit with the whole family! Find the full recipe from Forkly here.
Cranberry Crescent Rolls
This is the easiest recipe that combines two traditional Thanksgiving sides – Pillsbury Crescent Rolls and cranberry sauce! Simply add a spoonful of cranberry sauce to your crescent roll dough and roll up as usual. Your kids will love helping you assemble these Cranberry Crescent Rolls! Our family always looks forward to a night when we serve Pillsbury Crescent Rolls with dinner, and the cranberry sauce makes this dish feel more festive. You can even serve these as an appetizer! Find the full recipe from Beauty From Imperfection blog here.
Healthier Pumpkin Pie
I have two priorities when cooking for my family: make it easy and make it healthy-ish. I’m not a dictator about removing sugar from our house, but I do try to cut back where ever I can. That’s why I love Truvia Sweet Complete Monk Fruit Sweetener to replace sugar in baking. It’s a 1:1 replacement, so no additional measuring when following your favorite recipes for cookies, cakes, brownies and pies. Speaking of pie, Libby’s Famous Pumpkin Pie recipe is our go-to because, well, it’s easy as pie! My children help combine and stir the ingredients in a big bowl, then I pour it the filling into a pie crust and place in the oven. Voila! Traditional pumpkin pie without all the sugar!
Turkey Handprint Cookies
How adorable are these handprint cookies? Trace your child’s hand on card stock and cut out the handprint. Use it as a stencil as you cut handprint cookies out of sugar cookie dough. Your children will love decorating the turkey feathers with colorful chocolate covered sunflower seeds. These cookies are perfect to give to our dinner guests! Set them at each place setting for a thoughtful take-home treat! I got the idea for these Turkey Handprint Cookies from Stephanie over at Somewhat Simple. Find the full recipe here.
My Thanksgiving Meal Prep Tips:
Use the best cookware! As someone who loves to cook, I’ve learned that the quality of your cookware makes a huge difference! Le Creuset has been my favorite cookware brand for years because of its superior quality, versatility, and its beautiful! Their dishes are crafted from the fineest quality stoneware to ensure excellent heat distribution for uniform browning and even cooking with no hot spots. The dishes are finished with a beautiful glaze that is virtually nonstick for easy cleanup. This Thanksgiving, I’m using the Heritage Rectangular Casserole to make the Make Ahead Creamy Mashed Potatoes, but the dish also is perfect for making comforting casseroles, marinating meats, broiling fish and more. I love that it comes with a stoneware lid that locks in moisture and heat while baking and makes it easy to transport and serve dishes at a holiday buffet or potluck. For my pumpkin pie, I’m using Le Creuset’s Pumpkin Casserole to create a perfectly even-cooked pie, plus its so festive with its pumpkin shaped lid! My favorite Le Creuset glaze color meringue, and you’ll be happy to know the glaze is non-porous, non-reactive, scratch-resistant, and resists stains and flavor absorption! Le Creuset really is the best with its unmatched thermal resistance for temperatures ranging from -9°F to 500°F, and it’s safe for the freezer, over, microwavem broiler, dishwasher and metal utensils. These are dishes that you will use and treasure for a lifetime! Check out all their fabulous products at http://www.lecreuset.com.
My favorite Le Creuset cookware
Cook the day before Thanksgiving. Don’t wait until Thanksgiving Day to make your meal or else you’ll be miserable trying to balance cooking and entertaining guests. I always make my stuffing, potatoes and dessert a day or two before Thanksgiving, and save the vegetables and turkey for the actual holiday.
Enlist help! If you can get a guest to bring a dish, do it! I usually have family visiting from out-of-state for our Thanksgiving, so it can be challenging to ask them to bring a dish when they can’t cook in their hotel rooms. However, I solicit them to bring easy items, like wine or a pre-made appetizer or dessert from a gourmet grocer like Bristol Farms.
Set your table the night before. One less thing to do on Thanksgiving Day! The worst is when all the food is ready and you’re rushing to get the table settings out. I like to do a full tablescape with florals, poppers, formal napkins and china. It makes for a beautiful space for guests to take photos throughout the day, too!
What are your best recipes and tips for hosting Thanksgiving? Let me know in the comments below! For more recipe ideas, parenting and lifestyle tips, follow me on Instagram and TikTok!
XO Maggie
AFFILIATE DISCLOSURE: This post reflects my personal opinion about the information provided by the sponsors. Some of this post contains affiliate links for the products I use and LOVE. If you take action on these links (like clicking, buying, etc.), I may receive compensation at no cost to you. As always, all opinions are my own, and I’ll only recommend what I truly love. For more information about affiliates and your privacy, view our Terms & Conditions page here.
What’s scarier than ghosts on Halloween? Kids overdosing on sugar!
A hot topic every Halloween season is how to limit our kids’ candy intake. That’s why I love getting creative in the kitchen to make healthy food fun! For example: Cutie Pumpkins and Banana Ghosts! These fruity treats are so easy to make and fun to eat! They’re the best sweet and spooky after-school snack, or they’ll look fabulous on your table at your Halloween party!
Cutie Pumpkins: Peel clementines and cut celery into small sticks. Have kids add the celery sticks to clementines as stems to make pumpkins!
Banana Ghosts: Peel bananas and cut in half. Have your children add mini chocolate chips for the eyes and mouth to create ghosts!
If you’re looking for more healthy Halloween snack ideas you can make with your kids, check out my segment that aired on KTLA-TV last year, below, or read my blog post here.
Watch me share healthy Halloween snacks on KTLA in Los Angeles!
Use these tools to create a fun fruit platter for your Halloween party:
For more easy recipes and fun ideas for the family, be sure to follow me on Instagram and TikTok!
XO Maggie
AFFILIATE DISCLOSURE: Some of this post contains affiliate links for the products I use and LOVE. If you take action on these links (like clicking, buying, etc.), I may receive compensation at no cost to you. As always, all opinions are my own, and I’ll only recommend what I truly love. For more information about affiliates and your privacy, view our Terms & Conditions page here.
I shared these easy Spider Crackers on KTLA-TV last year, along with some other healthy Halloween treats for kids, and they were such a hit that I had to post them on my blog again this year!
Easy, festive and healthy Spider Crackers!
I love these Spider Crackers because:
(1) They’re easy! You only need 4 ingredients, and most of them you probably already have in your pantry!
(2) They’re customizable. Can’t take nut butter to school? Make these with sunflower seed butter or cream cheese instead! Don’t like raisins? Try currants or mini chocolate chips! Want a healthier cracker? Opt for whole wheat instead of regular Ritz crackers. Any round cracker of your choice will do!
(3) Halloween is often the kickoff to a holiday season filled with non-stop sugar, so it’s nice to create a savory festive treat for a healthy change! As a parent, I really try to limit our kids’ sugar intake where we can this time of year!
(4) They’re festive and versatile! Make these with your kids for an after-school snack, drop them in lunchboxes, or serve them at the class Halloween party!
(5) Your kids will love making these with you!
If you’re looking for more healthy Halloween snack ideas you can make with your kids, check out my segment that aired on KTLA-TV last year, below, or read my blog post here.
Watch me share these Spider Crackers along with other healthy Halloween snack ideas on KTLA-TV in Los Angeles!
Spread nut butter, seed butter, or cream cheese on two crackers thick enough to hold pretzels
Break 4 pretzels in half
Place the 8 half pretzel sticks around one cracker to resemble spider legs
Top the cracker with the second cracker to secure the legs and make a sandwich
Dip 2 dried fruit pieces in the nut butter or cream cheese and stick them to the top of the spider cracker sandwich to resemble eyes
Enjoy! Store in an airtight container for up to a week
I used regular peanut butter and raisins for this Spider Cracker, but you could also try cream cheese and mini chocolate chips!
Let me know if you try these Spider Crackers and what ingredients combination you choose to use! For more easy recipes and fun ideas for the family, be sure to follow me on Instagram and TikTok!
XO Maggie
AFFILIATE DISCLOSURE: Some of this post contains affiliate links for the products I use and LOVE. If you take action on these links (like clicking, buying, etc.), I may receive compensation at no cost to you. As always, all opinions are my own, and I’ll only recommend what I truly love. For more information about affiliates and your privacy, view our Terms & Conditions page here.