I’ve always loved Valentine’s Day, but when I was a kid growing up the 90s, it felt limiting and sad. Like, why do only couples get to celebrate “the day of love?!” I always had so much anticipation leading up to the holiday only to be let down that it wasn’t necessarily designed for little 7-year-old me. Sure, we had class parties and passed out Valentine’s cards, but it still always felt like the main focus was on romantic couples rather than ALL the people we love.
Then, there came the anti-Valentine’s Day movement when I was in my early 20’s where people dedicated the day to NOT celebrating romance and instead glorified being single. This also felt sad to me. The intent felt like it was coming from a negative place, so I never felt comfortable going out for a night on the town with my single friends celebrating NOT being in love. Valentine’s is supposed to be about all the positivity of LOVE!
Next came the GALentine’s fad in the mid 2010’s, and I loved this trend then and now! Finally, we’re expanding Valentine’s Day to love beyond romantic couples, and we’re sharing love with friends that matter so much to us! Every year, I do a fun little event with girlfriends to celebrate how much we love each other. Gosh, where would I be without the love and support of my gal pals?!
Then, I had children, and it only seemed right that I share my love of Valentine’s Day with them, too! So, in our house, we’ve made a point to celebrate Valentine’s Day as a day full of love for our family and everybody we love! Our kids still get to watch mommy and daddy go on a date and celebrate Valentine’s Day the old-fashioned way (which I feel is important), but we also make time to say and show how much we love each other as a family. And, we share our love with our friends and teachers, too! In our house, there’s never too much love, and it’s important to tell those who we care about how much we love them!
As part of our family’s Valentine’s Day tradition, I love to get small gifts for the children. I know some of you may be rolling your eyes thinking that I’ve fallen victim to another “Hallmark holiday” and consumer capitalism, but don’t freak out… these gifts are nothing like Christmas! They’re just small gestures that say, “I’m thinking of and love you!”
The small Valentine’s gift baskets I gave my kids last year
Another part of our family tradition is taking the time to put together gifts for our children’s friends, family and teachers. It’s so fun to hear what they love about each of their friends and help them pick out gifts for their grandparents and teachers.
I hope you’ll consider joining us in our new way of celebrating Valentine’s Day with everyone! Below, I’ve put together some fun gift ideas for kids, their friends, family and teachers! This year, I’m doing all personalized gifts by purchasing items that can be engraved or monogrammed. There’s just something so much more special about a personalized gift! It feels so thoughtful. Plus, they become keepsakes!
Valentine’s Day Gifts for Kids
Small gift baskets are my go-to for Valentine’s Day. Remember, this is not Christmas, so you don’t need to overdo it! My best recommendation is to stick to a practical theme, so you have a goal in mind and don’t overspend on frivolous toys and candy. For example, if you have a spring break beach vacation coming up, gift your chlid a beach tote filled with beach goodies, like a swimsuit, towel, sand toys, etc. Think of your child’s personality and what they like to do. If you have a budding artist in your house, make them a gift basket filled with art supplies.
For this year’s Valentine’s Day gifts for our kids, I’m turning to Personalization Mall, because they have hundreds of unique gifts you can personalize and use to create theme gift baskets. Here are some of my favorite gift baskets (or in this case, bags and buckets) ideas!
Beach-Goers Gift Bag – Put all these items into the striped beach bag, and you’re all set for your upcoming spring break vacation or summer! For even more fun, add a swimsuit, goggles and beach snacks!
Sous Chef’s Gift Bucket – If you have a little one who loves helping out in the kitchen, he/she will adore their own personalized chef’s apron, hat and utensils! Add this personalized pizza puzzle for a fun foodie touch! Put everything in an adorable custom treat bucket that can be used year after year!
Construction Lovers Bucket – If your little love can’t get enough diggers and bulldozers, consider building him/her a bucket filled with construction toys and gifts.
There’s no more precious gift than a photo of your kids, and Shutterbugs Photoshootsin LA has Valentine’s themed set-ups for your little loves! Founded by local mom, Rachel Nomann, Shutterbugs puts a unique spin on classic studio photography by capturing a variety of headshots showcasing your children’s personality in a monochromatic style. Shutterbugs is offering three mini photo shoot dates for special Valentine’s Day themed photos – January 28, January 31 and February 1 – but you can book a session with Rachel year-round, too! The Valentine’s Day Mini Sessions are 10-15 minutes per child for $100, and you’ll receive 5-7 black and white high-resolution images per child. Regular photo sessions are $200 per child and include 15-30+ high-resolution images of your child. I did a regular Shutterbugs photo session last year with my two kiddos, and we have used these photos several times as gifts for grandparents and friends, in addition to printing them for art on our wall at home. For larger wall prints, Rachel recommends using Smallwood Home. For standard prints both large or small, she recommends Shutterfly, Minted, or Artifact Uprising. To book a Valentine’s Mini Session or Regular Session with Shutterbugs Photoshoots, visit the link in Rachel’s Instagram @shutterbugs_photoshoots, or email littleshutterbugs@gmail.com.
Class Valentine’s Day Cards
I get nostalgic every year helping my kids making Valentine’s cards for their classmates. What a fun tradition! This year, I wanted to do something a bit more special! Instead of buying whatever character-themed cards were left on the shelves at Target, we decided to create our own personalized class Valentine’s cards with Minted. I love that Minted has hundreds of cards to choose from, and you can personalize each card with your preferred colors, shapes and messaging. This was a perfect excuse to use our Shutterbugs Photoshoots images, too! If you don’t want to use a photo, there’s so many fun cards with cute Valentine’s Day puns or games, like word searches and mazes. I also love that there’s some cards that encourage giving small toys and snacks rather than candy. We ended up choosing few different cards to give to our friends at school and at other activities, like tee ball and music class. We’re looking forward to giving our friends the cards you see below!
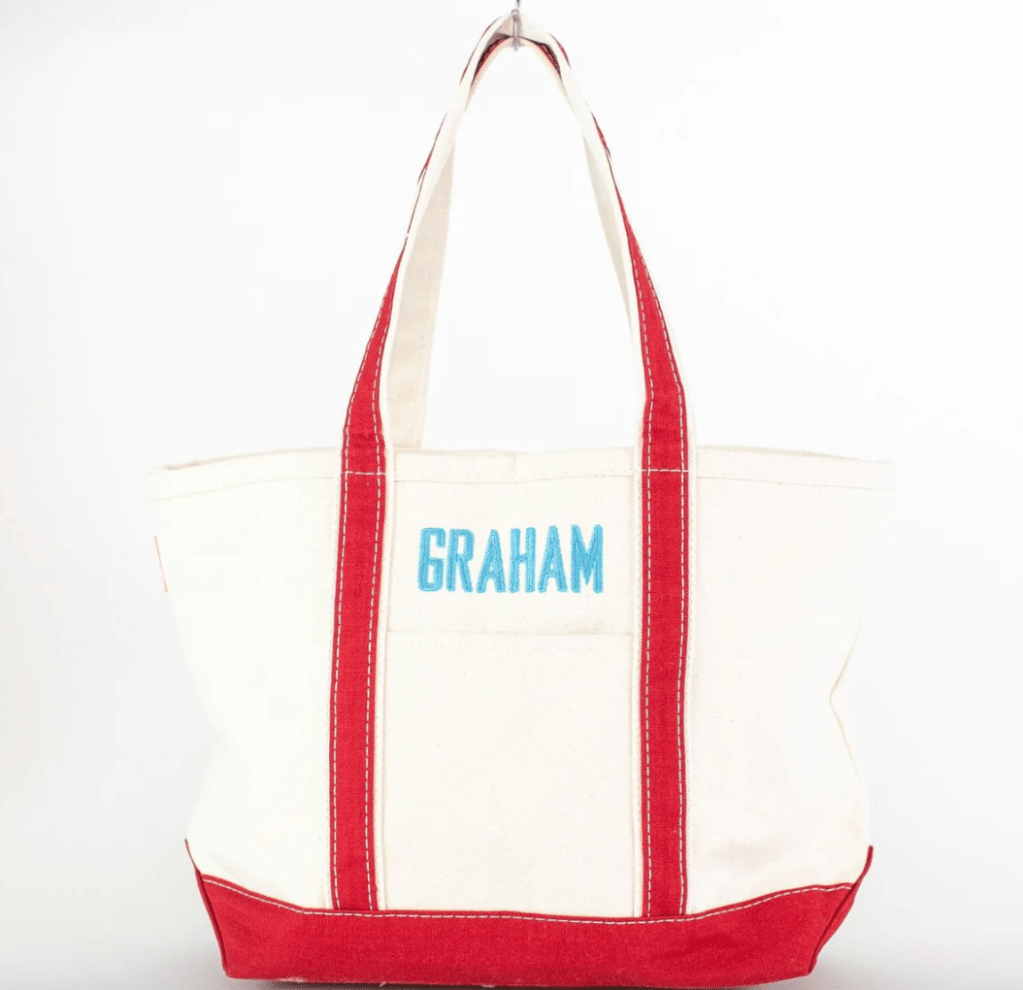
Teachers need ALL the love on Valentine’s Day! After all, they take great care into loving and teaching our children every day! Instead of gifting your child’s teacher the typical chocolates or flowers this Valentine’s Day, I recommend giving something personal and useful! The best place for personalized gifts in LA? The Monogrammed Home in San Marino! And, if you don’t live in LA, they ship! This adorable boutique has a large variety of thoughtful upscale gifts that can be engraved or monogrammed. I love the idea of giving teachers tote bags filled with desk supplies and other teacher essentials, like a cosmetics bag, key chain, etc. It’s also fun to make sure all the items are red and pink for Valentine’s Day! Below are some fabulous teacher gift ideas from The Monogrammed Home. Make sure you get all your orders in by February 2, so that you’ll get them monogrammed in time for Valentine’s Day! Shopping from here also means you’ll be supporting a small local mom-owned business! LOVE!
I’d love to hear about how you plan to spend Valentine’s Day in the comments below! For more product recommendations and lifestyle tips, be sure to follow me on Instagram and TikTok!
At the beginning of this year, I took a poll asking my Instagram followers what kind of recipes they’d like me to share. I asked my followers if they want to see: 1) Healthy meals; 2) Kids meals; 3) Party food to serve a crowd; 4) Quick meals (30 minutes or less). The majority requested to see “healthy meals” with “quick meals” falling shortly behind. Ask and you shall receive!! Or, in this case, vote in my poll and you shall receive! So, here I am, sharing a dinner recipe that is both healthy AND quick: One-Pan Chicken Fajitas!!
Where did this One-Pan Chicken Fajita Skillet recipe come from?
My husband and I are both originally from Texas, so Tex-Mex cuisine is a favorite in our household. However, Tex-Mex isn’t necessarily known for being healthy with its flour tortillas, extra cheese, butter and extremely large portions. When my husband and I started dating over a decade ago, we were relatively new to California and missed authentic Tex-Mex food. When I moved to Los Angeles, I was surprised to find that the Mexican restaurants here didn’t all serve sizzling skillet fajitas with flour tortillas, cheese, pico de gallo, sour cream, a side of charro beans with bacon, and our favorite… queso dip! In fact, when I arrived here in 2009, I could not find a Mexican restaurant that even knew what queso dip was! Most all of the restaurants only served corn tortillas and they rarely had the melty combinations of cheese in their fajitas and tacos, like monterey jack, queso blanco and colby jack. Compared to Tex-Mex, I thought Cali-Mex was, well, bland! I had to recreate our beloved Tex-Mex flavors at home, but there was another problem… My husband and I like to eat healthy! Okay, so that’s necessarily a problem, but it can be challenging when you love traditional Tex-Mex food! So, I was determined to create a healthy-ish version of some of our favorite Tex-Mex dishes, like chicken fajitas, and that’s how this recipe came about! We honestly eat this one-pan chicken fajitas meal at least 3-4 times per month… Actually, we eat it even more than that, because I’ll switch out the protein for carne asada, ground beef or ground turkey! You can make it even healthier by omitting or limiting the cheese. And, I always opt for a healthier tortilla, like Siete Foods Almond Flour Tortillas or Ole Xtreme Wellness Tortillas.
All the authentic Tex-Mex flavored goodness wrapped in a tortilla!
What kitchen equipment do I need to make One-Pan Chicken Fajitas?
Just as the recipe name implies, all you really need is one pan! For this recipe, I use the 10.5″ Caraway Fry Pan. Last year, I upgraded my cookware to Caraway, and it’s one of the best home investments I’ve made in a long time! I was worried about spending so much on cookware, but let me tell you, Caraway is worth it! It has a non-toxic coating, so you can feel good about making dinner for your family with the cookware without worrying about harmful chemicals. Plus, it’s non-stick and so easy to clean! Another thing that majorly separates Caraway from other cookware brands is its storage capabilities. I love that the 4-piece cookware set comes with pan racks and a lid holder to free up space in my cabinets and keep my kitchen organized and aesthetically pleasing. Practicality aside, I also adore how chic this cookware looks on my stove! I purchased the “iconic black” color, and the gold hardware is beautiful! It looks perfect in my modern black and white kitchen.
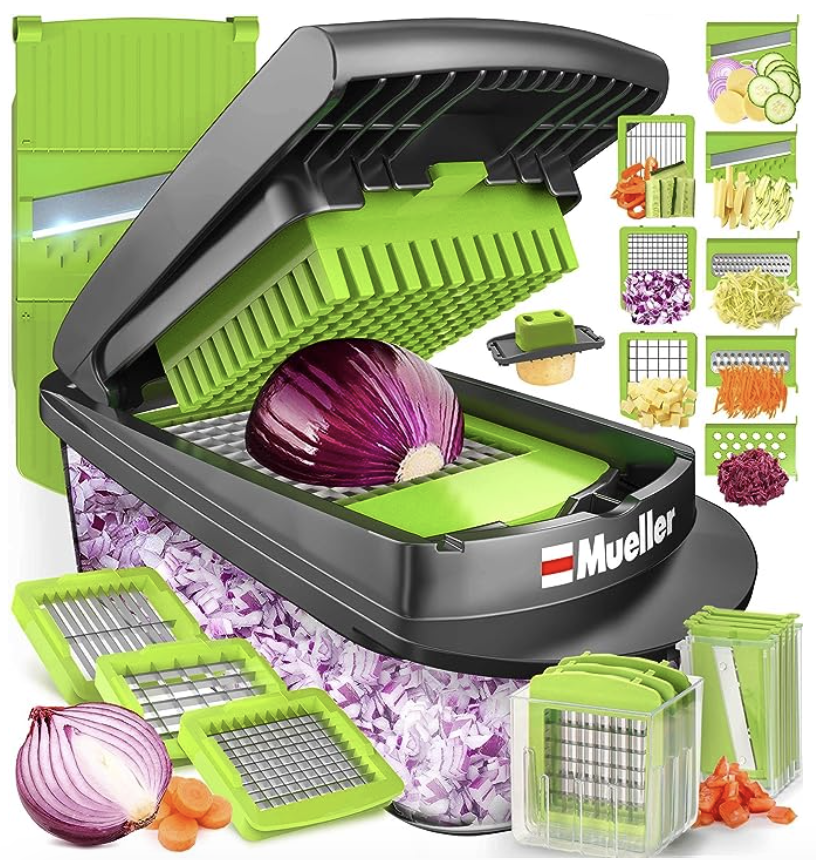
Another tool I loved adding to my kitchen this last year is this 8-Blade Chopper – perfect for chopping, dicing, mincing and julienning vegetables! My kids often like to help make dinner, and I like having this tool so they can help cut vegetables without using a big, sharp knife. And, it helps save time when you need to chop lots of vegetables! You can also use it to cut or crate cheese, fruit and eggs!
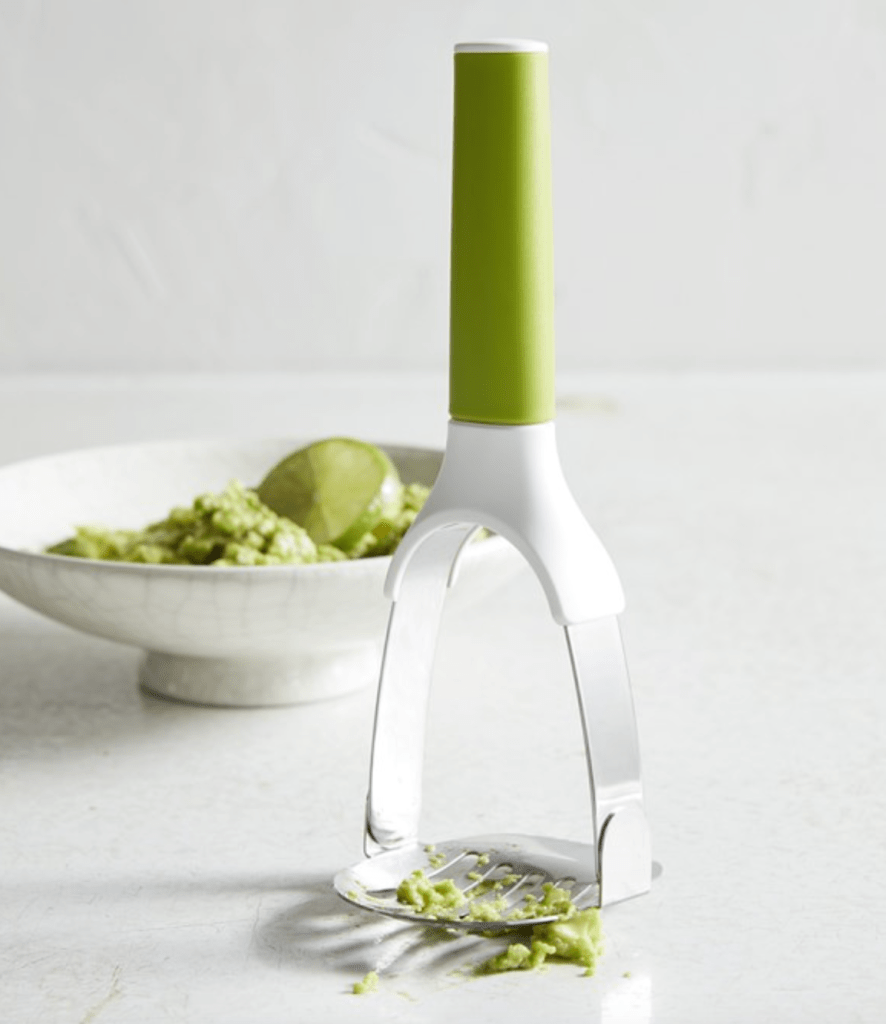
Okay, this next tool is a MUST-HAVE if you love guacamole or avocado toast: Williams-Sonoma Avocado Pitter & Masher! It’s designed to help you cut, pit and mash your avocados perfectly. Before I had this tool, I’d use a fork to mash my avocados, which was such a pain! I use this tool multiple times per week and consider it one of my kitchen essentials!
What Ingredients Do I Need for One-Pan Chicken Fajitas?
You can’t make chicken fajitas without, well, CHICKEN! I prefer to use chicken thighs for this recipe, but I’ve used chicken breasts plenty of times. Chicken thighs are a bit more flavorful. They’re also more affordable! You’ll also need a fresh bell pepper (my favorite is orange, but a red, green or yellow bell pepper works, too!) and red onion.
To give the chicken in this is recipe it’s authentic Tex-Mex flavor, I use Siete Mild Taco Seasoning. I love how versatile this seasoning is! I’ve used it for dips, and I’ve used it to make beef and turkey tacos, too!
To make authentic Tex-Mex fajitas, you need to wrap your chicken and veggies in a flour tortilla, but I like to swap out the flour tortillas for healthier options. My favorite tortillas are Siete Almond Flour Tortillas or Siete Cassava Flour Tortillas. Use Cassava Flour if you want a tortilla that’s closer to the taste of an original flour tortilla. However, I prefer Almond Flour tortillas because it has a faintly sweeter taste and it has more protein (6 grams!) per tortilla. Another favorite tortilla brand that I use often is Ole Xtreme Wellness Tortillas. I love that their high in fiber!
Watch me make One-Pan Chicken Fajitas on Instagram:
Mexican blend shredded cheese (I like Tillamook Mexican cheese)
Directions:
Add 2 tbsp avocado oil in skillet over medium-high heat, then add bell pepper and onion strips. Season with light salt if desired. Cook until soft, about 5-8 minutes. Remove veggies from pan and save for later.
Add remaining avocado oil to skillet if necessary. Add chicken to pan and cook through, about 8-10 minutes.
Add packet of Siete Mild Taco seasoning to chicken and 1/3 cup water. Stir to combine well.
Add bell pepper and onion back to skilett with chicken and stir to combine.
Add chicken to warmed tortilla. Top with cheese, avocado dip, salsa, taco sauce and any other preferred toppings. Enjoy!
If this is your first time hosting Thanksgiving, I know it can be very intimidating!
How much food should I serve? How do you make sure all the food is ready at the same time? How long do I have to cook the turkey?
That’s just a small sample of the many questions that come with playing hostess for the nation’s biggest meal of the year!
If you’re looking for guidance on how to make Thanksgiving easier and less stress-free, I have pulled together my 6 top tips for hosting!
Tip #1 – Create a timeline and master to-do list
Make Thanksgiving Day a breeze with a little extra organization and preparation. I like to make a master dinner prep timeline that includes what I should be doing 2 weeks leading up to Thanksgiving Day, along with a master shopping list. You can see my 2-week Thanksgiving dinner prep timeline here.
Tip #2 – Make as much food in advance as possible
In my opinion, the worst way for a hostess to spend Thanksgiving is spending the entire day in the kitchen without the opportunity to mingle with her guests. The solution? Make as much food in advance as possible! I like to make most of my dishes the day before Thanksgiving, but most casseroles can be frozen two weeks in advance! On Thanksgiving Day, all I have left is the turkey, a fresh salad, fresh vegetables and rolls. If you need inspiration for great dishes to make ahead of Thanksgiving, check out this list of my favorite casserole recipes.
Below are my favorite casserole dishes for Thanksgiving and anytime of year!
A week or two before Thanksgiving, check to make sure you have enough chairs, that your table linens are laundered and confirm that you have all the serving dishes you want to use. Growing up, we had a formal dining room in our home, and my mom would set the Thanksgiving table weeks in advance. Not only did it look beautiful in a space we rarely used, she didn’t have to scramble right before dinner to get the knives and forks on the table. My current home does not have a formal dining room, so I set the table immediately after breakfast on Thanksgiving Day.
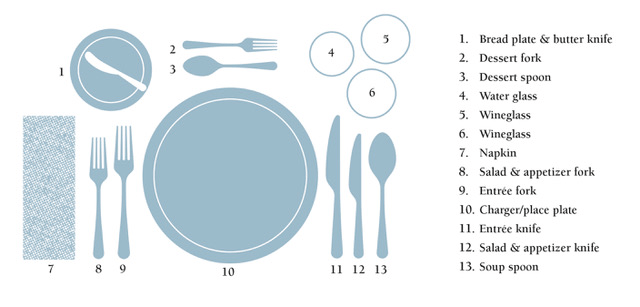
Here are some simple tips I learned from Emily Post Institute to remember how to do a formal place setting:
Who’s bread plate is that? Holding your hands in front of you, touch the tips of your thumbs to the tips of your forefingers to make a lowercase ‘b’ with your left hand and a lowercase ‘d’ with your right hand. This reminds you that “bread and butter” go to the left of the place setting and “drinks” go on the right.
Picture the word “FORKS”. The order, left to right, is: F for Fork, O for the Plate (the shape!), K for Knives and S for Spoons. (Okay, you have to forget the R, but you get the idea!)
Informal Place Setting from Emily Post Institute
Tip #4 – Don’t turn down help!
If someone offers to help with the Thanksgiving meal, allow them! Appetizers, salads, side dishes and desserts are great to delegate to willing guests. Sometimes, all they have to do is swing by a gourmet grocer to pick up a ready-made dessert or side. I especially love Bristol Farms for desserts, because they have such a high-quality selection and everything is made with the best ingredients! Currently, they have a seasonal Maple Pecan Bundt Cake that is absolutely delicious and perfect for Thanksgiving. If you’re a guest at someone else’s Thanksgiving, I highly recommend offering to pick one of these up to bring to your host!
Tip #5 – Have a drink station ready-to-go!
Create a drink station for guests to serve themselves while you’re getting dinner prepared. If dinner is late, no one will care with a drink in hand! For wine, I love serving bottles with a story. My favorite for this Thanksgiving is Thorne Wine, as its my friend’s and neighbor’s family’s wine. The 2019 Pinot Noir is the perfect Thanksgiving dinner pairing. This vintage is the kind that will please a wide range of palates with notes full of juicy blueberry, blackberry and plum with hints of juniper and white pepper. If you’re more of a white wine lover, I recommend trying Thorne’s 2020 Chardonnay, which is full and rich with yellow apple, pineapple and lemon zest notes on entry with vanilla, clove and cream accents. Both wines are available at thornewine.com and can be at your Southern Californian home in time for Thanksgiving if you order by November 19, 2023.
Thorne 2019 Pinot Noir
If you’re into cocktails, try Bristol Farms seasonal mixers, which are made in-house daily at the Fresh Juice Bar. For Thanksgiving, the Winter Rosemary Grapefruit Mixer (great with gin) and Citrus Dragon Fruit Mixer (nice with tequila) are perfect options to impress your guests!
I also always have a pitcher of water and glasses available at our drink station, so our guests don’t have to go hunt down their own water.
Cocktail bar of my dreams | Photo by David Tsay
Tip #6 – It’s okay to do store-bought
Look, hosting Thanksgiving can be a lot, and no one will blame you for outsourcing a few (or all!) of your dishes — especially if they taste great! When choosing where to purchase premade meals, Bristol Farms is a top choice to trust because the chain is known for its excellent quality in SoCal for over 40 years. Their meat department only serves the freshest, highest quality meats, which is hugely important when the centerpiece of your Thanksgiving dinner is the turkey. However, they do offer vegan and vegetarian options, as well! Bristol Farms is offering a wide selection of premade, read-to-heat and eat dishes, like Cornbread Stuffing, Butternut Squash Risotto and Cranberry Relish. And, don’t forget the Roasted Mary’s Turkey, of course! It’s free-range, antibiotic free, simply seasoned with a little salt, pepper, and fresh thyme, and slow roasted for full-flavored tenderness. Make sure you order your Bristol Farms Thanksgiving dinner orders by Tuesday, November 21, 2023 in time for pickup or delivery before Thanksgiving.
It’s Thanksgiving prep time, and I’m whipping up my favorite dishes in advance so that I don’t have to scramble the day of Thanksgiving to get the big feast on the table. As the host, I want to enjoy the day with my guests instead of spending all my time in the kitchen.
Enter the casseroles… Would it even be Thanksgiving without casseroles?! I love that you an make casseroles ahead of time, so Thanksgiving day can be a bit more enjoyable.
I grew up in the South, and the Southern women I knew growing up loved a casserole. I specifically remember one ginormous Thanksgiving I went to where everyone was asked to bring a dish and almost every single dish was a casserole except the turkey. Seriously, I’ve never seen so many casseroles! Green bean, corn souffle, au gratin potato, sweet potato, macaroni, broccoli and cheese, 10 different versions of dressing… it was a sight!
Now, I understand that some people despise casseroles. I mean, I get it. If you grew up eating casseroles at potluck dinners in the South, there is a strong chance that you’ve had some yucky casseroles! But, as someone who loves cooking for the selfish reason of wanting to eat tasty food, I have made it a priority to make my Thanksgiving casserole recipes yummy!
The best part about Thanksgiving casseroles? Most of them can be made and frozen weeks before the holiday to help eliminate cooking on the actual T-Day. Simply take them out of the freezer the night before to thaw in the fridge and reheat in the oven.
If you’re looking for a tried and true Thanksgiving side dish, I’ve shared a list of my favorite casseroles below!
This was my favorite Thanksgiving side growing up, and I’m certain that’s because it tasted more like dessert than a vegetable. I’ve never been a fan of adding marshmallows to the sweet potato casserole, though. That’s just too dessert-like. This dish from Food Network is simple to make and a perfect accompaniment to your holiday meal. Find the full recipe here.
When I was a kid, my mother taught me that Southern Living ALWAYS has the best recipes. So far, she’s been right. I’ve yet to try a recipe from the premier southern magazine that hasn’t been delicious. Just like this Bacon-Brussels Sprout-Green Bean Casserole. I grew up only eating green bean casserole at Thanksgiving but have taken to loving brussels sprouts in my adult years, so I love that this recipe combines them. Plus, every dish with bacon is better! This recipe calls for frozen green beans, but I like to use fresh. Find this full recipe here.
PHOTO: VICTOR PROTASIO; PROP STYLING: GINNY BRANCH STELLING; FOOD STYLING: EMILY NABORS HALL
When I first hosted Thanksgiving a decade ago, I was really interested in impressing my guests with some stellar sides. My foodie co-worker recommended this cherry-chorizo stuffing recipe to me, and it did not disappoint! I’ve always preferred cornbread stuffing, and the pecans are reminiscent of the dressing I ate growing up. Get the full recipe from Bon Appetit here.
I have a confession… I don’t really love mashed potatoes! I’ve always found them to be a bit bland. A loaded baked potato with bacon, butter and cheese, though? Heck yes! That’s why I love this Mashed Potato Casserole — its a combination of mashed potatoes and a loaded baked potato in one! So creamy and so delicious! Get the full recipe from House of Yumm here.
Mashed Potato Casserole from House of Yumm
There you have it, folks! These are the Thanksgiving casseroles I swear by and the ones our family enjoys each year.
Let me know in the comments below which of these you’d like to try! Connect with me on Instagram and TikTok for more easy recipes and family-friendly holiday ideas.
The nation’s biggest meal is upon us! If you are playing host(ess) this Thanksgiving, I’m delighted to share this 2-week dinner prep timeline to help you manage your time and stress leading up to the holiday. No one wants to be frazzled and rushed on Thanksgiving Day! As the person who is sacrificing their time, their home, their kitchen, their money and their sanity to host such a monumental meal, you deserve to mingle with your guests, have a glass of wine… heck, you even deserve to take some time to sit down and rest!
How gorgeous is this outdoor Thanksgiving tablescape? Stole this inspo from andeelayne.com.
You’re probably wondering what makes me qualified to share this Thanksgiving dinner prep timeline. As I’m writing this post, I’m preparing to host my 9th Thanksgiving in California. While I’m probably not as experienced as your granny who’s been making Thanksgiving for decades, I feel like I’ve learned all the rights and wrongs of how to prep for the “big feast” over the last 9 years with minimal help. You see, while I host 6-12 family members for Thanksgiving every year, I don’t actually have any family that lives close by to help prepare dinner (all of our relatives live in Texas). Other than my mother lending me a hand in the kitchen the day of Thanksgiving, there’s rarely any other assistance or delegation for the meal. My family is usually staying in hotels, so unless they pick up something from a restaurant or grocery store, no one is bringing appetizers and side dishes to contribute. And, to be honest, that’s okay with me. There’s no old auntie who insists on bringing her infamous green jello salad (thank god), so I have full liberty to craft our family’s Thanksgiving to my liking. Wow, that makes me sound like a control freak, which I promise I’m not — or am I?! No, what its really about is that I’m delighted to GIVE this meal to my family for Thanksgiving. What an honor it is to have so many family members travel thousands of miles to spend Thanksgiving with us. My husband and I are both the babies of our families, and it’s our way to thank our parents and older siblings for everything they’ve done for us over the years and thank them for making the trip to be with us on this holiday.
Our simple 2021 Thanksgiving tablescape. Rather than making our table busy with decor, I wanted to guests to enjoy each other and the view!Our 2014 Thanksgiving tablescape. We hosted 8 adults and 1 baby in our small condo. Now, we have 6 children in our family!
Below, you’ll find my 2-week Thanksgiving timeline with suggestions for food, drink and table preparations. This is the timeline I follow every year for a nearly seamless Thanksgiving Day where I can actually relax, sit on our balcony and chat with with my family and sip sangria while taking in our home’s beautiful SoCal mountain views.
If you’d like to learn from some of my past Thanksgiving hosting mistakes (or just have a good laugh!) scroll to the bottom of this post where I share three “Turkey Day Dinner Blunders.”
Ultimate Thanksgiving Dinner Prep Timeline:
2 Weeks Before
Plan out your table – Pull out your serving ware, dishes, table linens and décor you plan to use for Thanksgiving dinner. Make sure you have enough chairs for everyone.
Take inventory of kitchen tools – Is your food processor still missing that one blade? Do you know where your turkey baster is? Is it time to upgrade your mixer? Now is the time to locate and update your cooking gadgets, especially if you haven’t seen them in a while.
Plan your dinner and make your shopping list – List everything you plan to serve. Make note of the spices and ingredients you already have on hand and make a list of what you need to purchase.
Weekend Before
Buy your turkey and non-perishable food products and drinks – If your turkey is frozen, put it in the refrigerator to thaw. Stock up on your canned beans and vegetables, dried seasonings, nuts, seeds and beverages.
If you’re planning to make casseroles and desserts ahead of time and freeze them, make them now – For less stress on the day of Thanksgiving, desserts, dressing and casseroles, like sweet potato casserole, corn casserole and macaroni and cheese, can often be frozen then reheated in the oven.
3 Days Before
Shop for perishable food products – This is when you purchase your produce and dairy so it’s fresh for cooking the big meal
Day Before
Move frozen casseroles and dessert to fridge – If you made and froze your casseroles and dessert ahead of time, this is now the time to start letting them thaw.
Make remaining casseroles and dressing – If you didn’t already make your casseroles and freeze them, make them now and keep in the refrigerator until one hour before dinner.
Prep for remaining dishes and sides – Chop vegetables, make yeast rolls recipe to rise overnight, try to do as much as possible to make your holiday easier, and make a list of when everything should go in the oven tomorrow to be ready at the same time.
Thanksgiving Morning
Take the turkey out of the refrigerator and start prep – Let your turkey sit for 2 hours at room temperature before roasting. Plan on 13 minutes of roasting time for every pound or 15 minutes per pound if stuffed. You can view my Thanksgiving Turkey recipe here.
Set the table and arrange any centerpieces.
Get wine chilling and get your cocktail/drink station ready.
3-4 Hours Before Dinner
Assemble appetizers and remaining side dishes – Get as much completed as possible. You can always reheat dishes the hour before dinner.
2 Hours Before Dinner
Turn on music – Before guests arrive, set the mood for your party with music. Town & Country created a great Thanksgiving music playlist if you need inspiration.
Set out appetizers – The focus of the day is Thanksgiving dinner, so don’t stress about this too much. Some simple cheeses, crackers, fancy nuts and a fruit bowl is perfect. I also love the ease of premade snacks from my grocer’s freezer section and premade cheeseboards and dips from the deli section.
Set out drinks – Have your chilled wine and signature cocktail (if you’re making) easily accessible to guests. If dinner’s late, they won’t care if they have a drink in hand and some simple snacks! My guests have always enjoyed this Thanksgiving Sangria. I also fill a large pitcher with ice water and sliced lemons.
Let casseroles come to room temperature.
1 Hour Before Dinner
Take turkey out of oven – You turkey needs to rest 30 minutes to 1 hour before carving.
Reheat casseroles – Adjust oven temperature to
30 Minutes Before Dinner
Carve the turkey.
Assemble salad if making.
15 Minutes Before Dinner
Set out food – Take everything out of the oven and set on your dinner table or buffet table.
Light candles if using.
My 2022 roasted turkey was beautiful! My secrets for the best-ever juicy turkey include (1) cooking the bird breast side down for the majority of the roasting, (2) seasoning with Williams Sonoma turkey seasoning paste and (3) topping with Williams Sonoma turkey roasting glaze the 30 minutes of roasting.
Turkey Day Dinner Blunders
As promised, here are some of the silly mistakes that I’ve made when hosting Thanksgiving. Learn what not to do from my past blunders!
But it ain’t got wing: My first year hosting, I was intimidated to make a turkey, so I bought a premade smoked turkey from a local BBQ joint thinking that my barbecue-loving Texan relatives would get a kick out of it! I ordered a 12 lb. turkey to feed 8 adults. Well, when I went to pick up the turkey on Thanksgiving Day, they gave me a turkey that was 9 lb. because they “ran out” of the larger turkeys. I had no other choice so last minute, so I took the smaller turkey. Not only did we not have enough meat to happily feed everyone, the turkey was missing a wing… so it was ugly! I’m thankful to my mom and sister-in-law for offering to only have a “taste” of turkey that year. Lesson learned: If you’re going to order a premade turkey, make sure its from a reputable seller who guarantees the size of the turkey you ordered! This was my first time ordering from the restaurant and found them on an internet search. There wasn’t many restaurant reviews, so I should have taken it as a sign to order something else from them to test before Thanksgiving or at least be a bit skeptical!
When more is a bore: My second year hosting, our house was being renovated, so we rented a condo in Newport Beach to host everyone. Because I had a 3-month-old baby and wasn’t stoked about cooking a large meal in a kitchen I was unfamiliar with, I ordered a premade Thanksgiving dinner from a local grocery store. I was scarred from not having enough turkey the year before, so I over-ordered. I justified spending the extra money with that we’d be able to eat leftovers for a few days and I wouldn’t have to cook (I was an exhausted first-time mom and business owner at the time!). Not only did we have way too much food — think three 9×13 baking dishes of mashed potatoes — the food was TERRIBLE! The stuffing was so bland. I kept adding butter and seasoning trying to spruce it up. The salad was so boring with only iceburg lettuce, diced tomatoes and mini croutons. The turkey was so dry that I was dipping it in BBQ sauce. It was the saddest waste to dump multiple containers of uneaten food in the trash. We considered trying to donate it, but couldn’t figure out all the logistics in time. Lesson learned: Don’t overdo it on food. Again, if you order premade anything, make sure its reputable with good reviews — it’s even better if a friend who’s tried it recommends it!
Don’t dispose-ALL: One year, I was doing a lot of prep work the day before Thanksgiving. As I was cutting and chopping all of the vegetables that I would use in the stuffing, green bean casserole, and sweet potato casserole, I put all of the veggie waste in our sink’s disposal. I grew up in a house where we put everything in the disposal (banana peels, rotten bunches of lettuce, egg shells… seriously, everything!) in an effort to not stink up the trash, and I didn’t realize that this is not normal behavior until I started living with someone else. Sure enough, I clogged our sink, and boy did it STINK! Every time I turned on the disposal, smelly toxic green-brown sludge came spewing from the drain! It took us the evening and half of Thanksgiving Day to fix, so I was so delayed in prepping my meal without access to the kitchen sink. Needless to say, my Mr. Fix-It (A.K.A. my husband) was not very pleased. And, I hated feeling rushed to make all our dinner the day of Thanksgiving. Lesson learned: Not everything needs to go in the disposal. Also, have a handyman on-call who can come help fix any last-minute house repairs before guests arrive. It seems something in our house always breaks right before we host guests!
Now that I’m looking back, these Thanksgiving mishaps are hilarious! And, I realize that this is what Thanksgiving is about… It’s about the effort. It’s about wanting to create a meal that’s meaningful for your family. It’s not going to be perfect, but you’re going to learn a lot. I also believe that hosting Thanksgiving and the mistakes that can come with it is almost like a rite of passage. I watched my mother host Thanksgiving so many times, and while most of my memories are of how it appeared as though she effortlessly perfected an elaborate meal, I also remember her burning rolls, undercooking the turkey, forgetting to thaw the dessert and other funny little blunders. If you’re not able to execute your perfect Thanksgiving meal as you envisioned, brush it off. From my Thanksgiving missteps examples, I hope you can rest easy knowing you’re not the only one. And, you have 365 to try again (haha!).
Thanksgiving tablescape inspo! I dream of hosting an outdoor Thanksgiving like this one day! Image is from kpetersondesign.com.
Please let me know if this timeline is helpful and if you have any questions in the comments below. Connect with me on Instagram and TikTok for easy recipes, party ideas and tips to simplify your life!
Don’t let short notice hold you back from hosting a party! If you’re low on time and money, I have some easy, affordable ideas for throwing a last-minute Halloween party!
You can see all my Halloween party ideas on KTLA Morning News! It’s always so fun to join the KTLA team live in-studio! On this visit, I shared some spooky snacks and a creepy (but cute!) dessert using products from Siete Foods and Gelson’s Markets. I also made some simple Halloween decor using items from around my home and craft supplies from Michaels Stores. All my Halloween decor used in the KTLA TV segment is from Michaels (as well as almost all the decor I use in my home for every holiday!).
Halloween party food and decor ideas from Lifestyle and Party Planning Expert Maggie Jackson on KTLA Morning News
EASY HALLOWEEN PARTY FOOD IDEAS
Spiderweb Nacho Dip
An easy and festive Halloween party snack with Mexican flair using my favorite Siete Foods ingredients!
Spiderweb Nacho Dip using Siete Foods products
INGREDIENTS: Bottom layer: 2 cans Siete Foods Vegan Refried Ranchero Beans 2 tbsp lime juice 1.5 tbsp Siete Foods Mild Taco Seasoning 1 tsp minced garlic 3 roma tomatoes, sliced Middle layer: 1 cup Siete Foods Mild Salsa Roja 1 cup shredded Mexican cheese Top layer: 1 cup guacamole (I used @gelsonsmarkets fresh guac or you can make your own) 1 cup sour cream (I used Daisy brand’s squeezable for the spiderweb piping) For serving: Siete Foods Tortilla Chips (my favorite are Siete Foods Lime Tortilla Chips)
DIRECTIONS: Arrange sliced tomatoes around edge of large platter. Assemble bean mixture and spread in center of platter, leaving some tomatoes showing. Make sure that you create a bit of a “bowl” with the bean mixture for the salsa to sit in without running all over the platter. Spread salsa on top of beans, leaving some edge of beans showing. Sprinkle shredded cheese on top of salsa, leaving some salsa showing. Spoon guacamole over cheese layer and smooth into thin layer. Use Daisy Squeeze Sour Cream to create spider web design. Top with toy spiders. Serve with Siete Foods tortilla chips.
These “witch fingers” are quick, easy and no special chef skills are required! When hosting a big party, I’m all about cutting corners to save time, so for this recipe, I used a frozen cheese pizza and premade dipping sauce that I picked up at Gelson’s Market.
Pizza Witch Fingers
INGREDIENTS: Frozen thin-crust cheese pizza (I used Newman’s Own Four Cheese Pizza) 1 red bell pepper, cut into small triangles Premade pizza sauce or marinara sauce Litehouse Jalapeño Ranch Dip (or your other favorite dip like garlic aioli, ranch or marinara)
DIRECTIONS: Cook frozen pizza according to package instructions. Cut pizza into very thin triangle slices. Arrange pizza on circular platter with skinniest ends of the slices facing outward. Use marinara/pizza sauce as adhesive to add red bell pepper triangles to ends of pizza to resemble fingernails. Add a small bowl of Jalapeño Ranch Dip in the center of the platter for dipping. Enjoy!
No baking required for this easy and spooky cake! Take 2-3 brownies from the bakery section of the grocery store and add chocolate icing to make a “brownie cake.” Gelson’s Market sells decadent dark chocolate brownies by Renaud’s Patisserie, which works perfect for this! Melted marshmallows create a spiderweb effect!
Create a spiderweb effect on chocolate cake with melted marshmallows!
INGREDIENTS: 2-3 chocolate brownies from your grocer’s bakery section (I chose Renaud’s dark chocolate brownies sold in my local Gelson’s Market) 2 16oz containers of creamy chocolate frosting 1.5 cups mini marshmallows
DIRECTIONS: Remove brownies from packaging. Place first brownie on platter and top with thin layer of icing. Add second brownie on top of first brownie and add another thin layer of icing. Repeat this step if you are using three brownies. Cover the sides of the “brownie cake” with remaining chocolate icing. Place marshmallows into a bowl and microwave for 30 seconds. Using a fork, stretch melted marshmallows around brownie cake to create a spiderweb effect. Decorate with toy spiders. Enjoy!
DIY HALLOWEEN DECOR IDEAS
Upcycled Ghosts
I pulled empty containers out of our recycling to make these cute ghosts! I ended up using an apple juice bottle, coffee creamer bottle and smoothie bottle, but you could also use jars. Here’s the list of all the materials:
-Recyclable containers –Flour sack towels (cheap at Target or Walmart if you don’t have old ones lying around) -Sparkly black felt adhesive (you could also use regular felt or even construction paper) -Battery operated twinkle lights –Clear plastic ornaments or polystyrene craft balls (the clear plastic ornaments are fun because you can add lights inside but I didn’t have enough for all 3 ghosts)
This garland is so simple, and there’s no sewing! Create your own cute ghost garland with a handful of items you may already have at home, like safety pins, clear elastic bands and cotton balls. I got my ribbon, fabric marker and fabric shears at Michaels, which has been my holiday craft and decor go-to store for years! What I love about Halloween crafts is that there’s no pressure to make them exactly right – the imperfections make them spooky!
DIY Ghost Garland for Halloween
Ghost garland made with items from around the home and craft products from Michaels
Learn how I made this ghost garland in the video below!
Look around your backyard to create this easy centerpiece that will surely impress your guests! I cut branches from a tree and spray painted them black. You could also use dried branches found at Michaels floral department. Next, I created a bat stencil from a bat-shaped cookie cutter and used it to cut about 15 bats from black glitter felt that I found at Michaels. Then, I glued the bats to the branches. I recommend using a hot glue gun, Gorilla super glue or Krazy Glue to ensure they have a strong stick. After they dried, I assembled them into a tall glass cylinder vase. It could be fun to use a spooky vase like this one.
Which of these easy Halloween food and decor ideas would you try? Be sure to follow me on Instagram and TikTok where I share more easy recipes and fun DIY party ideas!
After I gave birth to my firstborn, my neighbor brought over a quiche, and I thought it was the best postpartum food gift ever! Quiche is good for breakfast, lunch, dinner or even a snack, and it was amazing not to worry about cooking or ordering food in those first few days home with a newborn!
I appreciated that postpartum quiche so much that I now I try to give a quiche to all my mama friends with a newborn. This classic Quiche Lorraine recipe is my go-to, because it’s so easy and absolutely delicious. Salty bacon, fluffy eggs, creamy gruyere cheese and a flaky pie crust make this quiche a real winner. I like to use a frozen pie crust to cut time and make this recipe even simpler!
The quiche I made from the recipe below (adapted from Delish.com) is headed to one of my mama friends, and I doubled the recipe to have one for our family.
Easy Classic Quiche Lorraine
Ingredients:
1 9-inch pie crust, frozen
8 slices bacon
1 1/2 cups shredded Gruyère, divided
1 shallot, minced
6 large eggs
1 1/2 cups heavy cream
Pinch of cayenne
Pinch of nutmeg
Kosher salt
Freshly cracked black pepper
Chopped green onion (optional)
Directions:
Preheat oven to 375°. Allow frozen pie crust to thaw for 10-20 minutes. Use a fork to prick holes around the bottom and sides of the crust. Bake for 5-10 minutes.
While pie crust is baking, cook bacon until crispy in a skillet over medium heat, about 8 minutes. Transfer to a paper towel-lined plate to drain.
Scatter cooked bacon on pie crust with 1 cup Gruyère, shallot and green onions.
In a large bowl, whisk together eggs, cream, cayenne, and nutmeg and season with salt. Pour mixture over bacon and cheese. Sprinkle with remaining 1/2 cup cheese.
Bake until crust is golden and eggs cooked through, 40 minutes. Let cool 15 minutes before slicing and serving. Enjoy!
What other variations of quiche do you like? Let me know in the comments below if you try this recipe! Or, connect with my on Instagram and TikTok!
AFFILIATE DISCLOSURE: Some of this post contains affiliate links for the products I use and LOVE. If you take action on these links (like clicking, buying, etc.), I may receive compensation at no cost to you. As always, all opinions are my own, and I’ll only recommend what I truly like and think you will, too. For more information about affiliates and your privacy, view our Terms & Conditions page here.
When my husband suggested that we take a weeklong family vacation to Kauai, I was more than thrilled — I was ecstatic! With our family’s busy schedule, it’s extremely rare for us to take a full week off from work and personal responsibilities for leisure travel. In fact, I don’t think we’ve ever vacationed for a full week together – not even on our honeymoon! We travel a lot, but it’s usually over long weekends or we’ll attach some vacation days to a work trip. That being said, we were more than ready for a vacation where we could spend some real quality time together relaxing, going on adventures and creating memories. And, I knew Kauai would be a fabulous destination for this!
If you’re not already familiar with Kauai, it is Hawaii’s fourth largest island and the furthest from the mainland that you can visit. It’s easy to see why Kauai is nicknamed “the Garden Isle” with its plethora of tropical green beauty covering the entire island. So far in my Hawaiian travels, I’ve visited Maui twice, Oahu twice, and now this was my second time to visit Kauai. It was a very meaningful visit, because Kauai was where my husband and I spent our “babymoon,” so it was really special bringing both of our kids with us to explore the place where mommy and daddy spent our last vacation before becoming a family.
On the beach in front of our resort in Kauai
At the time I’m writing this, our children are 4 and 2 years old. Some people might think we’re crazy for spending a whole week on vacation with our toddler-aged children in a different time zone and out of their routine. But, in my opinion, a whole week away was actually easier than a few days! By day three, we all had settled into a routine and finally felt that we could relax. Yes, RELAX! It is possible to relax with toddler aged children, and we did it! We also had many memorable adventures and fabulous dining experiences. I’ve outlined our full 8-night and 7-day Kauai itinerary with kids below!
But, first!! Do you know what makes a weeklong family vacation easy? Having the right kids’ travel gear!
Packing and unpacking your family is so easy with this four-tier packing cube that acts as a carry-on closet to keep your belongings organized and in plain view. You will no longer have to dig in your suitcase to locate your 2-year-old’s tiny socks! What makes this luggage organizer stand out among other packing cubes out there is the fact that it has four compartments — three shelves to store folded clothes and one zip-up container at the bottom that’s great for stashing toiletries, shoes or dirty laundry — and two hooks so that it can hang, making it easy to unpack and repack at your destination. This packing cube is durable and lightweight, in addition to coming in two different sizes and multiple different colors. I purchased the large and extra large in grey earlier this year, and it has been such a game changer to keep mine and my children’s belongings organized. I typically put pajamas, socks and underwear in the top compartment, my son’s clothes in the middle compartment and my daughter’s clothes in the third compartment. I’ll put shoes in the bottom zip-up compartment. In the large size, I was able to pack 4 days worth of clothes for the kids, who are ages 4 and 2 as I’m writing this. I love that I simply hang it up in the closet when we arrive, so we’re no longer living out of disorganized suitcases or accidentally leaving a shirt or sock behind in a hotel drawer! Do yourself a favor and get this portable hanging organizer before your next trip!
Car seats are a huge pain to schlep through the airport, especially if you have more than one child, like me! I also dislike taking them with us to a destination where we’re not renting a car. Constantly installing the car seat in Ubers then carrying it into a restaurant or museum can be really annoying. Enter: The RideSafer Vest!!! This is a safe, legal and convenient device that makes it easy to travel in taxis or ride shares when you get to your family’s destination. The vest lightweight (less than 2 pounds) and comes with a small backpack that children can easily carry themselves. Most importantly, it’s crash tested and safety certified – it meets or exceeds Federal safety standards! The RideSafer Vest features a unique, 3-clip design that positions the car’s seat belt comfortably and correctly on your child. Just slip it on like an article of clothing, fasten in the front and place the seat belt through the metal belt guides. Most children can do all of that themselves if you teach them and practice a few times. It also comes with a shoulder tether for a consistent sitting position and increased security. The tether also makes it possible for kids to ride safely in the middle seat without a shoulder strap! RideSafer offers four different sizes of the Vest, so this device is an option for parents with children ages 2 and up.
The same company that makes the RideSafer Travel Vest also makes an extremely lightweight TravelSmarter Booster Seat. This seat can be used with the vest, and they both fit into a backpack weighing less than 3 pounds. My kids have no trouble carrying it! The TravelSmarter Booster Seat is great for smaller children who may enjoy looking out the window, but it is not required to use with the vest. You can use the booster alone or with the vest or you can use the vest without the booster.
There’s a growing concern over the rise of noise-induced hearing loss from headphones and earphones, leaving parents alarmed and looking for solutions to protect their children’s ears. Thankfully, I found Puro Sound Labs Junior Jams bluetooth headphones, which help keep little ones entertained on long flights while limiting volume to 85 decibels (the recommended listening level). What sets these volume-limiting headphones apart is their 22 hours of battery life, superior sound quality and fold-up feature, making them easy to store in little kids backpacks. These headphones also boast a sophisticated design, bright color options and durability. We have gone through a couple of headphones in the last 3 years that simply couldn’t hold up to travel or stopped working shortly after purchasing, but Puro Sound Labs creates quality headphones with a 1-year warranty! These headphones are perfect for children ages 3 to tween.
Puro Sound Labs also has developed PuroQuiet, which features active noise cancelling for little ones to tune out the loud world around them without having to increase their headphones volume. PuroQuiet bluetooth headphones have a volume limit of 85 decibels, 35 hours of battery life without the active noise canceling on, and 23 hours with it, and blocks out 78% of background noise. The PuroQuiets cost a bit more than the Junior Jams, but they’re so worth it for the active noise cancelling feature!
Our favorite toy brand Melissa & Doug is fantastic at developing toys and activities to keep babies and toddlers engaged through screen-free open-ended play. The Water Wow! reusable travel painting sets have been a staple in our house since my firstborn was around 18 months old. I love to throw these in my diaper bag and surprise the kids with them once we get on the plane or when they need to keep busy at a restaurant. Simply fill the pen with water, and your kids can paint the pages in the book to reveal colorful, educational scenes. The color disappears when the pages dry, so kids can paint them again and again. The best is that there’s no mess (besides maybe a little bit of water)!
For babies under 1 year old, Melissa & Doug just launched the Take Along Ice Cream Toy that clips to strollers, diaper bags, high chairs, car seats, and more to keep the fun close to little hands. Babies love pulling the cone to reveal four adorable ice cream scoops with friendly faces. When expanded, the toy vibrates and plays chiming sounds as it shrinks again. This toy helps kids develop fine motor and sensory skills with its multi-textured features, vibration and sounds. If I had a baby again, I’d definitely bring this cute little toy with me! Make sure you check out all of Melissa & Doug’s awesome travel-friendly toys on their website!
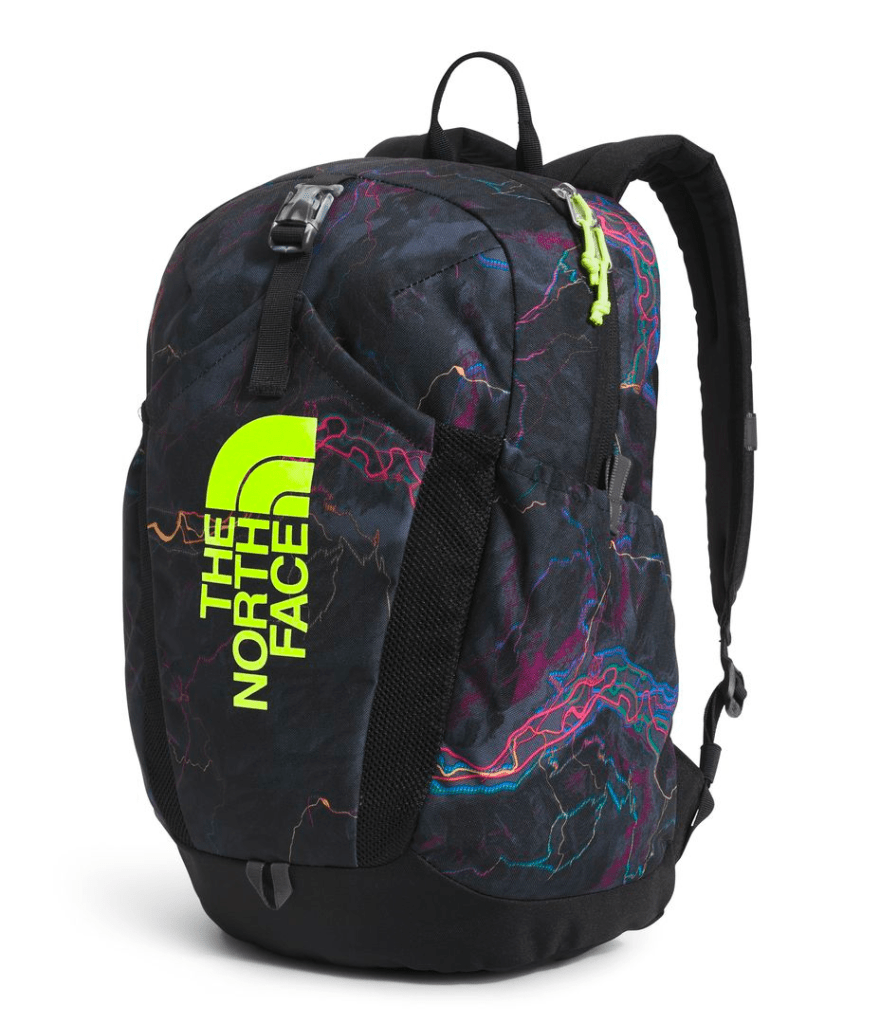
One of the best things a family can do when traveling together is have each person responsible for their own stuff! Traveling got so much easier once my toddlers were able to wear a backpack filled with their favorite snacks and toys. Plus, it’s fun for them! They love the sense of purpose and responsibility, and my kids enjoy packing their own backpack, too! The North Face has been a trusted brand for family adventures for years and makes three different sized backpacks to fit your child’s travel needs at every age. The Mini Explorer is perfect for preschoolers, the Youth Mini Recon is great for elementary school age children and the Youth Court Jester is a solid choice for tweens and high schoolers. I love The North Face, you get a lifetime guarantee with free returns, durability and high functionality. These are high quality backpacks that your kids can use for everything!
Now, on to our one week in Hawaii. Check out our entire itinerary, below!
FAMILY TRAVEL ITINERARY: ONE WEEK IN KAUAI WITH KIDS
Day 1: Travel Day
Everyone is a combination of tired and excited on travel days, so we take this day to settle in and get organized. We arrived at Kauai’s airport in Lihue just before noon, picked up our rental car (rental cars are a must if you want to conveniently explore the island at your leisure), and went straight to our resort, Marriott’s Kauai Beach Club, which was also located in Lihue. My in-laws are Marriott Vacation Club timeshare owners, so that made choosing our accommodations easy. Marriott has two properties on Kauai (one in Lihue and one in Poipu), and we chose the location in Lihue, because we had never stayed there before. For our babymoon, we enjoyed staying in Poipu, which is a very popular resort location, but wanted to try something different for this trip.
Our villa wasn’t quite ready when we arrived, so we left our bags with concierge and headed to Duke’s Kauai for lunch. Duke’s is an iconic restaurant in Hawaii, and it was a nice way to kick off our vacation with Mai Tai’s, fish tacos and an ahi poke bowl while watching surfers and stand-up paddle boarders ride waves into Kalapaki Beach.
Checking out the grounds of the Kauai Marriott Vacation Beach Club
Once our villa was ready, we unpacked our bags, and the kids and I went down to enjoy the pool while my husband went to the local market to get breakfast, lunch and snack items for us for the week. Our 2-bedroom villa had a kitchenette, which made it convenient to save money and let our little kids relax for breakfast and lunch every day. I also really loved that the kids and adults each had their own room joined together by a common living space. A couple years ago, the four of us stayed in a hotel room on Maui with double queens, and I’ll probably never do that again with little kids! It’s way too challenging with nap schedules, the kids needing to spread out and play, along with mom and dad needing some alone time on vacation!
Example of villa room; photo courtesy of Kauai Marriott Beach Vacation Club
That evening, we were all worn out from the time change and still full from our massive lunch at Duke’s, so we had small snacks and went to bed early so we could be ready for our next adventure tomorrow!
Side note: If you’re looking for tips for traveling with kids, check out some of my favorite kid-friendly travel products here.
Birdseye view of resort; photo courtesy of Kauai Marriott Beach Vacation Club
Day 2: Resort Orientation Day
On any big vacation, I always like to take the first full day to get completely acclimated to our new short-term home. We had a big day exploring the Kauai Marriott Vacation Beach Club. Since we were awake so early with the 3-hour time difference, I started the day with a run around the resort. There were lots of golf paths which provided beautiful views. Our family then headed to the beach, where my husband rented a surf board and boogie board for the day from the resort’s on-site beach rental hut. The kids enjoyed jumping over waves and simply digging in the sand while dad surfed. Then, daddy helped them learn to boogie board. I also purchased a ball from the resort, so we spent a bit of time kicking the ball back and forth on the beach before it was time to head up to our room for lunch. After lunch and naptime, we spent the afternoon at the pool, which had an awesome kids pool with a slide! The resort sold child-size pool floats at the pool hut, and our kids loved splashing around in those all afternoon. For dinner, we did poolside dining at the resort’s Kukui’s Restaurant, which served classic Pacific Rim fare. It was convenient and tasty, but I wouldn’t go out of my way to eat here if you’re not staying at Marriott’s Beach Club.
Kauai Marriott Vacation Beach Club Pool
Day 3: Daddy Golf Day!
If you have a golfer in the family, don’t miss The Ocean Course at Hokuala — Kauai’s only Jack Nicklaus Signature course and the longest stretch of oceanfront golf in Hawaii! Our 4-year-old son tagged along with daddy (for a fee) on this spectacular course where they enjoyed amazing scenery and challenging golf. Our son’s favorite parts were the wild roosters and hot dogs, of course. Our 2-year-old daughter and I enjoyed a relaxing morning in our room before spending time at the resort pool together. The whole family met up for lunch at the room, then did more pool time in the afternoon.
Golfing in Kauai
For dinner, we went to Hualani’s at Timbers Ocean Club & Residences, which was one of the very best meals we had in Kauai! The view on a cliff overlooking the ocean and a lighthouse is breathtaking, the ambiance with live music is so pleasant, and the food is top-notch. The restaurant uses ingredients predominately sourced from local farmers and purveyors, so everything is fresh, and it was all cooked to perfection. They had a special mango and prosciutto appetizer on the menu that night, and it was the best mango I’ve ever had in my life! So fresh, soft and sweet! I need to note that Hualani’s is a bit more upscale, but they were very welcoming to our children. If we do go to a fancy as a family, we always try to dine on the earlier side and bring lots of activities to entertain our children while waiting for our food. Luckily, there was a spacious lawn area where our children were able to get some of their wiggles out before dinner arrived. We 10/10 recommend this restaurant if you can get a reservation!
Wearing our red, white and blue for Memorial Day dinner at Hualani’s at Timbers Resort in KauaiFabulous dinner at Hualani’s
Day 4: Poipu Beach & Gaylord Plantation Adventure
By our fourth day, we were all settled in, adjusted to the time change and ready for a big day!
First, I got a massage at the resort’s spa. To be honest, it wasn’t the most luxurious spa I’ve been to, but my masseuse was very good and I felt relaxed afterward. Then, we headed to Poipu which has a great beach for kids where you can swim and snorkel in shallow lagoons. There’s also lifeguards! This was an incredible experience for the kids, because we got to see three large sea turtles on the beach and one swam right next to us! We got to see some seals swimming next to us, too. It was really cool to be so close to nature!
For lunch, we ate at the famous Puka Dog which serves Hawaiian style hot dogs. To be honest, I’m not sure what all the fuss is about, as I thought the bread was dry and there wasn’t enough sauce, but my kids absolutely loved it! The shop also sold Hawaiian Shaved Ice, so this is all around a fun family-friendly spot to grab lunch. We took our hot dogs and shaved ice over to a picnic table at Poipu Beach Park to enjoy watching the waves.
After lunch, we went back to our resort where we spent an hour at the pool before cleaning up and getting ready for our evening at Gaylord Plantation, a famous large estate on Kauai. We did the Plantation Train Tour, which included a 2.5-mile ride aboard an old-fashioned train around the plantation where we saw a working farm and got to feed farm animals. This was a huge hit with the kids! Afterwards, we ate dinner at The Plantation House, which had a really cool ambiance in a historic home. We had the Hamachi and Ahi Crudo to start, my husband tried the Kurabuta Pork Osso Bucco Island Style and I ordered the Plantation House Signature Oscar, which is the day’s fresh catch encrusted with parmesan cheese, pan roasted and topped with crab meat, truffleyaki and Hollandaise. Everything was really decadent!
Gaylord Plantation Train Tour
Day 5: Hike & Luau
This was one of my favorite days of the whole trip. We got up bright and early to drive to Waimea Canyon to hike the Canyon Trail to Waipo’o Falls. This 3.6-mile “moderate” hike was definitely challenging with a 4- and 2-year-old, but we made it work with the Piggy Back Rider which is a ergonomically designed standing child backpack carrier. The Piggy Back Rider is convenient for travel, because it can fold up to fit inside a backpack. Our busy kids loved that they could hop on and off the carrier as they were exploring on our hike. I’m so happy we did this trail, because the views are incredible. You’ll definitely get some great pictures! Fun fact: My husband and I did this hike together on our “babymoon” when I was pregnant with our first baby. That made this hike all the more special to show our kids what mommy and daddy loved doing before we became a family.
Fantastic views on our Waimea Canyon hike!
Check out our tips for doing this Waimea Canyon hike in Kauai with kids at the Instagram Reel video below!
After the hike, we were all starving, so we hit up Island Taco in Waimea on our way back to Lihue. This place was so cute, and the staff really took pride in their food while sharing excellent recommendations and suggestions for different combos and sauces based on how they personally like to eat their tacos. My husband got the Kalua Pork Taco, and I got a Coconut Crusted Shrimp Quesadilla that was on special for the day, and it was SO GOOD! Island Taco’s tortilla chips are amazing, too. You can tell they’re freshly made in house. This place really hit the spot after a big hike!
By time we got back to our resort, we only had a few minutes to rest before getting ready to go to the Aulii Luau in Poipu. There are a few Luau’s to choose from in Kauai, but we chose the Aulii Luau, because its the only oceanfront celebration. Being by the ocean is one of the whole reasons we came to Hawaii! This was the third authentic luau I’ve been to in my life and probably the best. The setting on Poipu Beach was stunning as the sun set in the background while watching the talented Hawaiian dancers and musicians. Our kids had so much engaging with the performers before the show started, and we were all mesmerized by the talented fire dancers! The host of the show did a great job being very interactive, too. This luau definitely had the best food compared to the two ones I’ve been to on Maui. Warning – this luau is not cheap! But, we thought it would be one of the most memorable and authentically Hawaiian moments of our trip, so it felt worth it to us!
Loved their coordinated Hawaiian outfitsAt the Aulii Luau in Poipu
Day 6: Resort Day – Again!
The last two days were so jam-packed with excursions and activities around the island that we decided to take it easy at our resort. My husband went surfing while the kids jumped over waves in the morning, then we spent the afternoon by the pool. For dinner, we popped over to Duke’s Kauai (located on property). Afterwards, we walked to a little ice cream shop in Lihue, then sat on the beach watching the sunset while eating our frozen treats.
The resort sold kids floats
Day 7: Last Chance For Tourist Attractions!
In our opinion, Kauai’s land and ocean are the most magical of all the Hawaiian islands, so it was important for us to share its natural beauty with our kids. We decided to take the morning to visit Spouting Horn Park, which is a scenic viewpoint featuring a blowhole spouting water high in the air. The kids got a huge kick out of watching the blowhole, but the attraction didn’t take longer than 15-20 minutes to explore so our morning activity was over quick.
Sprouting Horn; photo courtesy of Kauai.com
We drove past the McBride & Allerton Gardens National Tropical Botanical Gardens, so we decided to stop in and see what it was about. We were visiting on a Friday, and according to all the signs we saw, Thursday evening was the best time to go during the summer with a farmers’ market, live music and family movie projected in the gardens. There was an option for a guided tour, but at $60 per adult and $30 per child, we decided to skip and tour ourselves around the preliminary grounds close to the parking lot and gift shop. As I looked back through photos of the tour on Google reviews, I wish we would have tried it! Kauai has some of the most extraordinary fauna, so it would have been cool to see some of its magical trees and plants in person!
It was starting to get close to lunchtime, so we headed over to Poipu Shopping Village to walk around, shop and grab a bite. We hadn’t purchased any souvenirs during the week, so we grabbed a couple of fun t-shirts for the kids at Crazy Shirts. I love that the shirts are dyed with natural substances, like crater dust, cinnamon and apricot. We lunched at Bubba Burger, which has the best hamburgers on Kauai! We also treated ourselves to onion rings and truffle fries! The treats continued with ice cream at Lappert’s, which is the best local ice cream in Hawaii and made in Kauai! I wanted a flavor that felt Hawaiian, so I got the Caramel Coconut Macadamia Nut, and it was creamy and delicious!
Hawaiian rainbow cone!Caramel Coconut Macadamia Nut — Best ice cream in Hawaii is Lappert’s!
The rest of the afternoon was spent by our resort pool before we got ready to go to a sunset dinner at The Beach House, which is arguably one of the best restaurants in all of Hawaii with a spectacular oceanfront setting. I love that the restaurant felt very upscale but they still had a kids menu that included a scoop of ice cream. I ordered the seared ahi steak which came with jalapeño mashed potatoes, local grilled broccoli and soy sesame maui onion sauce, and it was divine!
Aloha from Beach House Kauai!Sunset at Beach House restaurant
Day 8: Goodbye Kauai!
Our flight was scheduled to leave at 1:10 p.m., and since we were located close to the airport, we had a little bit of time in the morning to enjoy the resort one last time. I got up really early to be the first one on the beach and in the ocean as the sun was rising, and it was magical. I had only been to the beach with the kids (which we all know isn’t so “relaxing”), so it was really special to have a peaceful swim out by myself and look back at the island. When I came back to the hotel room, my husband had the kids dressed to go swimming at the pool one last time.
Then, it was time to go home. We felt a little sad leaving, but we also were so grateful to be able to spend a whole week on Kauai that there wasn’t much room to be upset about it. We got everything out of this vacation that we wanted: quality time as a family, new adventures, relaxation and priceless memories.
What would you like to know about visiting Kauai with kids? Was there anything we didn’t do on Kauai that we should try next time? Let me know in the comments below, or I’d love to connect with you on Instagram! Follow me @maggiehjackson.
It’s currently early August, and the back-to-school commercials have started and stores are putting out pumpkins and fall decor… Wait, what?! It feels like my summer just got started! If you’re like me, you may not want summer to end. Or, maybe you want the heat to end but still want the free and joyful feeling of one last summer vacation.
Labor Day weekend is traditionally the “last summer hurrah” for most people before school starts and the fall season begins. But, because it’s such a popular holiday weekend, travel prices can be outrageously expensive. Nothing bothers me more than paying double the price for a hotel that I know was much less the weekend before! Maybe it seems that one last holiday weekend escape is out of budget for your family this year, but have no fear, I got you!
After working in travel public relations for over a decade, I’ve become an expert at finding quality hotels in great destinations at prices that make sense. Here, I’ve compiled a list of the best hotels in places that are easy to get to from Los Angeles for your final summer vacation over Labor Day weekend. Whether you’re looking for a beach vacation, a mountain escape, to get out-of-state or a camping experience, I have something for every budget and taste!
Pst… I also shared this list on KCAL-TV (CBS; Los Angeles) Morning News on August 12, so be sure to check it out below!
Hold up! Before we get into my list of travel destinations, you need to check out my must-have travel products for kids. From portable carseat solutions to in-flight entertainment, I have everything to prep you for your next family vacation!
A waterfront Best Western?! Yes, please! The best part of Best Western Plus Island Palms Hotel & Marinais the views, as it overlooks Point Loma and a private marina which welcomes sailboats, super yachts and cruisers. This budget hotel has a private resort setting with two waterfront swimming pools, a pickleball court, a tennis court, a delicious onsite restaurant, free WiFi, complimentary bike rentals, pier fishing options and boating activity, along with cheap parking at $10 per night. It’s full-service restaurant and bar features breakfast, lunch, happy hour and dinner featuring delicious California coastal cuisine. When you’re ready to venture out with the fam, the hotel is a short drive to SeaWorld, San Diego Zoo, Balboa Park and Ocean Beach.
Labor Day Weekend Rates: A king bedroom starts at $211 over Labor Day Weekend, which is an amazing price for a waterfront hotel over a holiday weekend! Click here to book!
Take a road trip north for a scenic mountain vacation at Sierra Nevada Resort, which is soon to rebrand as Outbound Mammoth, in Mammoth Lakes, Calif. Sierra Nevada Resort opened in November 2022 as Mammoth’s newest resort in nearly a decade with 179 accommodations including deluxe rooms, fireplace suites, and chalets with an inviting lobby, dining concept, and wine bar.
Occupying a historic 1967 building that was once a preferred getaway for Hollywood elite, the newly reimagined Sierra Nevada Resort welcomes guests to a western classic reborn as a modern mountain retreat in the heart of Mammoth Lakes, California. Widely regarded as California’s best ski destination, Mammoth Lakes is an unsung gem in the summer, when the snow melts and gives way to lush green terrain for epic mountain biking, horseback riding, rock climbing and hiking, as well as water activities like kayaking and stand-up paddling. In addition to the town of Mammoth Lakes, the resort’s central location offers access to the region’s most prized landmarks including the nearby Devils Postpile National Monument; Bodie State Historic Park; Ancient Bristlecone Pinecone Forest; Yosemite National Park; and Death Valley.
Labor Day Weekend Rates: Rooms start at $209 Labor Day Weekend. The resort is offering a special 20% off the best available rate if you tuned into my KCAL-TV (CBS; Los Angeles) segment that aired on August 19, 2023. Stay dates for this offer are now through December 31, 2023 (blackouts may apply, and there’s 24-hour cancellation policy. Use code CBSLA when booking here.
In a destination known for pricey hotel rooms, The Leta Santa Barbara Goleta, part of the Tapestry Collection by Hilton, offers approachable rates for families looking to soak up the sun in this quaint coastal town. The Leta hotel in Santa Barbara is a chic, stylish hotel with a retro vibe in Goleta, California, the perfect basecamp to hit the local beaches, explore the vibrant culinary scene, or enjoy activities such as hiking, biking, surfing, paragliding, sailing – or just relaxing by The Leta’s pool. The Leta offers a welcome local craft beer upon check in, along with a complimentary wine hour serving coastal California wines. The hotel also has a secret gem restaurant that locals love called CAYA, as well as the Leta Bar with both classic and signature cocktails. The hotel is dog friendly and offers your furry friends dog bowls, beds & pet waste bags upon request.
Labor Day Weekend Rates: The Leta is offering a special package: Stay 3 nights and get 1 free with rates starting at $234 per night with a waived destination fee. The offer includes self-parking, Wifi, morning coffee, evening reception, a Gold’s Gym pass, electronic newspaper (cannot be combined with any other offer, free night must be part of a booked stay, free night has no cash value). Book this offer here. Considering that the median rate for hotels in the Santa Barbara area are at least double this (and in many cases into the thousands per night) – this is an amazing deal!
If you’re looking for a memorable camping experience, try the Santa Margarita KOA Holiday! This campsite is an ideal Central Coast escape, situated right near San Luis Obispo and Paso Robles wine country and the 101, and just 30-minutes to coastal towns like Avila Beach. You can experience wineries, hiking in oak lined pastures and lowkey beaches – all in one trip. The campground features more than 70 acres of lush outdoor beauty carved into a hill with a variety of sites available for Labor Day Weekend, including Deluxe Cabins (featuring full indoor kitchens and bathrooms), Camping Cabins, RV sites, and tent sites, plus the high-quality customer service and guest experience that KOA is known for. Experience epic stargazing at the campground, due to its variety of hilly vista points and dark skies year-round. During the day, dig into the campground’s exciting amenities including its swimming pool, jumping pillow, family games like disc golf, Kamp K9 for pets and even a “Party Yurt” with arts and crafts for kids on Saturdays at 10 a.m. through Labor Day Weekend. Santa Margarita Lake is also just down the road, where visitors can enjoy fishing, hiking, biking, boat rentals and horse trails.
Labor Day Weekend Rates:Deluxe Cabins start at $300/night; Yurts start at $185/night; RV sites start at $144/night; Camping Cabins start at $140/night; Tent sites start at $66/night. Book on KOA’s website here.
If you’re looking to get out of California, Austin, Texas is one of the USA’s hottest booming destinations and it’s less than 3 hours away from LAX by air! Experience all the “Keep Austin Weird” vibes at Hotel Indigo Austin Downtown-University, a stylish boutique hotel in the heart of Austin, right in the center of the Red River Cultural District on the famed 6th Street. It’s the perfect location to explore all the exciting live music, restaurants and bars in the area – though if you prefer, you can just lounge at the hotel’s beautiful rooftop pool, which has a view of the city. It also has a cool poolside bar and stylish terrace to beat the heat under the scorching Texas sun. Amenities include a great fitness center as well as LadyBird Kitchen + Bar, serving American cuisine and signature craft cocktails (they just launched an incredible weekend brunch).
Labor Day Weekend Rates: Beginning Friday night, rates start at $199 – not bad for a hotel stay in the midst of the hottest part of Austin, Texas! Book your room here.
Get luxury for less in Burbank, as Hotel Amarano has everything for both kids and adults at an affordable price. Hotel Amarano is a secret gem luxury boutique hotel tucked between film studios and the leafy equestrian center neighborhood in Burbank. Inspired by the glamour of old Hollywood, Hotel Amarano’s upscale design with a beautiful courtyard pool and onsite bar and restaurant will feel like a relaxing retreat for parents. Kids and parents alike will love Amarano’s location in the “Media Captial of the World,” as it’s within walking distance to iconic studios to tour, like Warner Brothers, Disney and NBC, in addition to being a close drive to Universal Studios Hollywood and the scenic tree-lined streets Downtown Burbank. The hotel features a fitness center and bikes for guests to cruise around. It’s also pet-friendly and offers dog bowls on request. Their signature restaurant, FYC Bar + Kitchen, offers a modern take on California fresh contemporary cuisine and craft cocktails and is a local and entertainment industry favorite. Designed with rustic details and the glamorous drama of Hollywood.
Labor Day Weekend Rates: Hotel Amarano is offering a special advance purchase rate starting at $258 per night – a great deal for a luxury hotel in Los Angeles! Book your holiday weekend staycation here.
Which of these destinations would you like to visit for Labor Day? Let me know in the comments below, or connect with me on Instagram @maggiehjackson!
AFFILIATE DISCLOSURE: Some of this post contains affiliate links for the products I use and LOVE. If you take action on these links (like clicking, buying, etc.), I may receive compensation at no cost to you. As always, all opinions are my own, and I’ll only recommend what I truly like and think you will, too. For more information about affiliates and your privacy, view our Terms & Conditions page here.
There’s nothing I love more than discovering a great new wellness brand, especially one that lives up to the hype!
For example, last year, I discovered Juna Detox Drops, which transforms my water into an antioxidant-rich powerhouse drink, and Seed Daily Synbiotic, a 2-in-1 capsule-in-capsule probiotic and prebiotic. The combination of these two products has been life changing for my skin and overall health. The first thing I do every morning is add two droppers full of the Juna Detox Drops (psst.. use code MAGGIEJACKSON for 15% off on juna-world.com!) into a glass of water and drink while taking the Seed Synbiotic capsules. I credit this morning ritual with clearing up my skin from some crazy hormonal acne that popped up after my second baby.
But that’s a story for another time…
This year’s best new health brand discovery is KROMA WELLNESS! And pst… use code MAGGIE15 for 15% off your first purchase of all Kroma Lifestyle Resets and Daily Essentials!!
Kroma Super Porridge topped with OMG Cookie Butter
Why Kroma Wellness?
I’m always on the lookout for ways to live better and healthier, so most of my Instagram feed is filled with brands, celebrities and influencers who do the same. I was leisurely scrolling through the ‘gram one afternoon when I noticed one of my fave influencers, who happened to be pregnant, answer a question from another user about why she was doing the Kroma Reset while expecting a baby. That seemed unusual for a pregnant woman to be doing a “reset” diet to me, so I was immediately intrigued. The influencer responded with something like, “I use the products from Kroma because they’re nourishing.”
Reset… Nourishing... Those are the two words that stuck out to me. And two words I never thought would go together when associated with the typical wellness cleanse… So, naturally, I had to know more!
I went on a deep dive exploring Kroma Wellness and discovered that this brand isn’t your stereotypical cleanse or celebrity diet that requires you to fast, only drink juices or eat bland food that completely eliminates an entire food group (or two!). As someone who once had many issues with dieting and exercise (like, MAJOR issues that wrecked havoc on my health and landed me in years of therapy), I’m very conscious of any sort of fad or social media trend claiming to detox, cleanse or jump-start weight loss. Anyone who’s been fooled into doing a program like that knows what I’m talking about. Those are quick fixes and not sustainable. I find that true wellness is a lifestyle, and Kroma is just that.
Kroma’s Reset introduces you to how great you can feel (and look!) when your diet is full of nutrient-dense superfoods without processed sugar, gluten and dairy. Kroma is designed to keep you satiated and energized with simple meal, drink and snack solutions that literally anyone can do at home or on-the-go. And, Kroma offers a variety of convenient products to continue your superfood health journey after the reset is over. The company was founded by mom and health guru Lisa Odenweller with renowned Functional Medical Expert Dr. Will Cole advising on nutrition, so you know it’s legit!
Learning all of this, I was SOLD and decided to purchase Kroma’s Signature 5-Day Reset to try the first week of January 2023. I first learned about Kroma in December 2022, while I was in the midst of holiday parties, indulgent eating, excess sugar intake and drinking too much alcohol. I was definitely not feeling my best and longing to not only get back to “normal” eating but reach an even higher level of health. Kroma’s website described the company as helping others to live their “healthiest, most vibrant life,” and that was exactly what my body and mind was craving!
Kroma 5-Day Reset | Photo credit: Allison Zaucha
First Impression
After ordering my Signature 5-Day Reset, it took about 3 days to arrive. I was giddy to find it on my doorstep and opened it immediately. The Reset comes in a beautiful white box, and your food and drinks for the next five days are color-coded and displayed in a circle with Kroma’s famous OMG Cookie Butter in the center. Each day contains 10 sachets of nutritious food, drinks and supplements. The reset includes the following for each day:
Break Your Fast – Beauty Matcha
Breakfast – Super Porridge
Hydration – Cranberry Hydration Elixir
Boost – A plant-based smoothie like Blueberry Acai Immunity, Banana Cacao or Vanilla Cinnamon
Lunch – A broth like 24K Chicken Bone Broth, 24K Beef Bone Broth or a Veggie Broth with Plant Protein
Fuel – Supergreens Elixir
Snack – A latte, like Spicy Passion Latte, Change Your Life Chai Latte or Ultimate Vitality Latte
Energy Snack – OMG Cookie Butter
Dinner – A broth like 24K Chicken Bone Broth, 24K Beef Bone Broth or a Veggie Broth with Plant Protein
The beautiful and nourishing foods in Kroma 5-Day Reset
The package also included a comprehensive brochure to help guide me on my reset. The brochure included information on three reset protocol options: Lifestyle, Lean and Active. Lifestyle is the most popular protocol and “for anyone looking to lose a few pounds, reset habits, rejuvenate, and feel better overall.” The Lean protocol is for someone looking to accelerate weight loss, and the Active protocol is for athletes or for those who need additional nourishment to optimize their active lifestyle. I decided to go with the Lifestyle protocol, because I wanted to feel great and lighter without feeling deprived or depleted. The brochure featured tips for success, my grocery shopping list, daily schedule and a plan for after the reset was over. I was ready to get started!
My 5-Day ResetExperience
Here is a breakdown of my experience with each sachet in my 5-Day Reset:
Break Your Fast: I was so excited to start feeling the benefits of this reset that I truly didn’t care that I’d have to eliminate my morning coffee and replace it with Matcha. This was huge for me, because I’ve been drinking morning coffee daily since I was a senior in high school (I don’t want to date myself but that’s almost 20 years!). On the first day, I blended Kroma’s Beauty Matcha with 8 ounces of Unsweetened Almond MALK — which is the ONLY brand of almond milk anyone should buy, because as far as I know, it’s the only one on the market that doesn’t have oils, gums and other filler ingredients in it. I drank the Matcha warm hoping to play a trick on my body and mind that it was the same thing as my usual coffee. It wasn’t as sweet as my normal morning coffee, but I was desperate for a pick-me-up so it went down fast. I immediately wished I had another Matcha or could drink a cup of coffee, but I was determined to stick to the program. The next morning, I tried the Beauty Matcha blended with Almond MALK over ice instead of warm, and I liked it way better! Not sure why or how, but it tasted sweeter over ice. For the first two days, I would start to get a headache mid-morning that would last through the afternoon, which is very rare for me. I seriously never get a headache, so I knew it must have been the caffeine withdrawals from skipping my morning coffee. Still, I didn’t cheat and kept going with the program. Go me!
Breakfast: I really liked the Super Porridge for daily breakfast, and I assume that’s because I normally love to eat oatmeal in the morning. This was like a supercharged oatmeal with nuts, seeds and other superfoods rich in antioxidants. Every morning, I ate the Super Porridge warm, mixed with Almond MALK and topped with a handful of raspberries. If you already like oatmeal like me, you’ll love this for breakfast!
Hydration: Immediately after breakfast, I drank the Cranberry Hydration Elixir. This was delicious! I could see myself drinking this every morning for a boost of electrolytes, which I’ve recently learned is so important to add into your diet, especially if you workout a lot like me. I guess I was scarred from all the junk in traditional sports drinks that we guzzled in the 90s. True to Kroma, this is made with only good stuff: Coconut Water, Cranberry, Citric Acid, Ginger Extract, Aquamin Mg®AG, Himalayan Pink Salt, Stevia Leaf Extract (Rebaudioside M), Ascorbic Acid, Cayenne Pepper*, Thiamine Hydrochloride, Riboflavin.
Boost: On the first day around 10 a.m., I had the Vanilla Cinnamon Plant Based Smoothie blended with Almond MALK, spinach and a handful of frozen blueberries. It was tasty and filling, almost like an entire meal. On the second day, I blended the smoothie with less berries and only water. On the third, fourth and fifth days, I simply blended the smoothies with water or half MALK and half water, because I was starting to feel full and like I was consuming so much constantly. I realized this reset definitely wasn’t a depleting diet!
Lunch: I LOVE Kroma’s Bone Broths! On the first day, I ate the 24K Chicken Bone Broth and added wilted spinach and zucchini slices that were sautéed in olive oil from dinner the night before. I also added a dash of Sriracha because I love anything and everything spicy! This was such a quick and easy lunch to make. I loved that the 24K Bone Broths glittered like they’re actually made of gold! The Veggie Broth was yummy, too, but Bone Broths were the winner! Again, I felt very satisfied and like I ate a complete meal.
Energy: Every day, I treated myself to post-lunch dessert with a spoonful of the OMG Cookie Butter, and that really did make me say O-M-G! What a delightful little treat that’s rich and nutty with hints of coconut. And, I love the goji berries for little surprises of extra sweetness in every bite!
Fuel: A couple hours after lunch, I drank the Supergreens Elixir, which tasted great and really made me feel like I was drinking some sort of magical superpower drink! The Supergreens Elixir is made with 75 vitamins, minerals, and whole food-sourced ingredients to make getting your daily dose of greens easy and incredibly enjoyable. You’ll never have to eat a salad again!
Snack: The reset includes an afternoon latte to curb afternoon cravings. My favorite was the Spicy Passion Latte. To be honest, I never felt like I needed one of the lattes to curb any afternoon cravings. The reset was so nourishing that I really didn’t have any cravings! In fact, adding the latte felt like too much, so I skipped drinking them the last two days of the reset, but I enjoyed them the following week.
Photo credit: Allison Zaucha
Dinner: The last meal of every day is a 24K Bone Broth or Veggie Broth again. I really liked that I could add veggies and lean protein to the broths, so it didn’t feel like I was eating the exact same thing all the time. However, I have to admit that I got a little tired of only eating broths for lunch and dinner towards the end of the five days. For dinner, I’d make my family our normal healthy dinner and simply pull a few pieces of protein and veggies from the meal and add them to my broth. So, I still feel like I partook in our family Mexican and Mediterranean nights while doing the reset!
Photo credit: Allison Zaucha
After Dinner Supplement: Every night, I drank the Calming + Restore Magnesium mixed into a glass of water. I’ve been hearing a lot lately about the benefits of taking magnesium before bed, so I was excited to implement this into my routine to calm my mind, relax my muscles and support my digestive system. I slept like a baby during the 5-Day Reset, so I have attribute the great snoozes to this supplement!
My Reset Benefits
At the conclusion of the 5-Day Reset, I truly felt rejuvenated — my mind felt clearer and my skin was glowing! However, I wasn’t miraculously slimmer and didn’t drop weight. (I did lose two pounds a couple days after the reset was over, which I thought was interesting.) To be honest, I was a bit bloated the last couple days of the reset, and… TMI… I got a little backed up, if ya know what I mean. I think my bowels were used to my morning coffee as its daily diuretic and trying to adjust to my new healthier lifestyle without it. I think that if I stuck to the Reset diet for a few more days, my body would adapt.
Here are the two best things that came from my Reset:
(1) Healthier heart rate – On the morning after the Reset was over (day 6), I was sitting on the floor playing with my kids, and my Apple Watch alerted me that my average heart rate per minute dropped by 9 heart beats over the last five days! WHAT! That’s phenomenal! A diet that removes processed sugar, gluten and dairy and supplements with nourishing superfoods can truly optimize my health to its very best. I’ve always heard that food can be medicine, but I never thought I could have results like this! And in only five days!
(2) My view of optimizing daily health was forever changed – I’ve always considered myself a healthy-ish eater, so I never thought much about the occasional indulgences, like alcohol, dessert and processed snacks. But, watching how my health significantly improved in only five days on the Reset was extraordinary! The Reset was an education for me on how superfoods can positively optimize my overall wellbeing and gave me the confidence in moving forward with this regimen as a daily lifestyle. I’ve often thought that eliminating certain foods or taking on a new diet was too hard, expensive or intimidating, but Kroma made it so easy to do and underscored the importance of making quality nutrition a priority in my life.
The notification I received that my average heart rate dropped while doing the 5-Day Reset
The first morning after completing the Reset, I poured myself a cup of coffee, because I thought I missed it so much. I took a sip, and WHOA…. it tasted so bitter! As I mentioned earlier, I’ve been drinking coffee forever, so I’ve never had trouble with the taste. I’m not sure what some sort of magical change the Reset had on my tastebuds, but I was shocked that I didn’t love drinking coffee as much as I did before completing the program. I’m a little ashamed to admit that coffee has found its way back into my morning routine… however, I only drink one cup in the morning now, and I’ve replaced my second cup with the Beauty Matcha.
My most favorite product has been the Supergreens Elixir, because I feel like it helps me reach optimal nutrition even if I fall off the wagon a bit. Like, even if I have a cheeseburger for dinner, I feel good because I got all my vitamins, minerals and greens from the Supergreens Elixir earlier in the day. It may look a little intimidating being green and all, but I promise it tastes great! It has a hint of vanilla sweetness to it, and I look forward to drinking it every morning.
I really do feel like I’ve had a lifestyle shift since my first 5-day Reset. I’ve cut out alcohol during the week, significantly eliminated added sugar and cut back on gluten. I’d say I’m really living a vibrant existence, and Kroma’s Reset helped me get here.
As I’m writing this, I’m looking at my next 5-Day Kroma Reset. This time, I ordered the Deluxe edition, which includes additional tools, like the Gold Kroma Frother, Kroma Tumbler, Hemp Travel Pouch and Tumeric Ginger Tea. I got the Signature 5-Day Reset the first time I did Kroma and used my own frother, but I coveted the pretty Kroma branded products I saw in the brochure. Now that Kroma is a part of my daily life, I figured it made sense to get them.
Deluxe version of the 5-Day Reset
So, Is Kroma’s Reset Worth It?
Kroma’s Signature 5-Day Reset (the first one I did) costs $395, and I’d say it’s completely worth it if you can afford it. For me, the 5-Day Reset wasn’t a quick weight-loss fix (although I did feel great after completing the program); it was a full-on lifestyle shift that I’ve carried with me now months after completing my first Reset. I now integrate many of the Daily Essentials into my everyday life. If you’re ready for REAL lifelong results, DO IT!
If you’re on a budget but would like a sample of what Kroma can do for you, I recommend choosing 2-3 Daily Essentials products that you’d like to start integrating into your daily routine. If you’re new to Kroma, I recommend trying the Beauty Matcha, Supergreens Elixir and Cranberry Hydration Elixir, because they’re super easy to add into your routine, don’t take a lot of time or skill to make, and they’re non-perishable!
Kroma Daily Essentials
The Bottom Line
The 5-Day Reset is for anyone looking to optimize their wellbeing. Kroma offers three different personalized tracks to align with your intention of doing the reset, whether you’re looking to lose a couple pounds or enhance your workouts. No matter which track you choose, you will not be deprived while doing this reset. I promise, I never felt hungry in the five days. But, what I did feel was nourished and energized!
Ultimately, Kroma positively changed the way I view food and nutrition. Not only did I feel the healthy change on the inside, my Apple Watch’s heart rate monitor proved to me what was happening on the inside — My heart rate dropped an average 9 beats per minute during the 5-Day Reset! To me, that is clear proof that this reset is worth the investment. Do it for yourself. Your body and mind will thank you.
Now that I’ve been using Kroma’s products for 7 months, I’d love to know any questions you may have about the 5-Day Reset or Daily Essentials products. Drop your questions in the comments below, or connect with me on Instagram at @maggiehjackson.
And, DON’T FORGET!! You get 15% off your first Kroma purchase with my promo code: MAGGIE15